Developer Guide
Table of Contents:
- Acknowledgements
- Setting up, getting started
- Design
- Implementation
- Documentation, logging, testing, configuration, dev-ops
- Appendix: Requirements
- Appendix: Instructions for manual testing
- Appendix: Planned Enhancements
Acknowledgements
Setting up, getting started
Refer to the guide Setting up and getting started.
Design
.puml files used to create diagrams in this document can be found in
the diagrams folder. Refer to the PlantUML
Tutorial at se-edu/guides to learn how to create and edit
diagrams.
Architecture

The Architecture Diagram given above explains the high-level design of the App.
Given below is a quick overview of main components and how they interact with each other.
Main components of the architecture
Main has two classes
called Main
and MainApp. It
is responsible for,
- At app launch: Initializes the components in the correct sequence, and connects them up with each other.
- At shut down: Shuts down the components and invokes cleanup methods where necessary.
Commons represents a collection of classes used by multiple other components.
The rest of the App consists of four components.
-
UI: The UI of the App. -
Logic: The command executor. -
Model: Holds the data of the App in memory. -
Storage: Reads data from, and writes data to, the hard disk.
How the architecture components interact with each other
The Sequence Diagram below shows how the components interact with each other for the scenario where the user issues
the command delete i/T0123456A T0124563B.
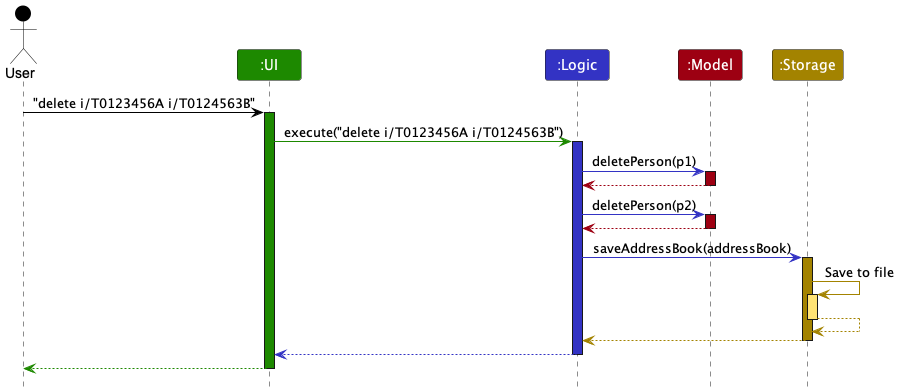
Each of the four main components (also shown in the diagram above),
- defines its API in an
interfacewith the same name as the Component. - implements its functionality using a concrete
{Component Name}Managerclass (which follows the corresponding APIinterfacementioned in the previous point.
For example, the Logic component defines its API in the Logic.java interface and implements its functionality using
the LogicManager.java class which follows the Logic interface. Other components interact with a given component
through its interface rather than the concrete class (reason: to prevent outside component’s being coupled to the
implementation of a component), as illustrated in the (partial) class diagram below.

The sections below give more details of each component.
UI component
The API of this component is specified
in Ui.java

The UI consists of a MainWindow that is made up of parts e.g.CommandBox, ResultDisplay, PersonListPanel
, StatusBarFooter etc. All these, including the MainWindow, inherit from the abstract UiPart class which captures
the commonalities between classes that represent parts of the visible GUI.
The UI component uses the JavaFx UI framework. The layout of these UI parts are defined in matching .fxml files that
are in the src/main/resources/view folder. For example, the layout of
the MainWindow
is specified
in MainWindow.fxml
The UI component,
- executes user commands using the
Logiccomponent. - listens for changes to
Modeldata so that the UI can be updated with the modified data. - keeps a reference to the
Logiccomponent, because theUIrelies on theLogicto execute commands. - depends on some classes in the
Modelcomponent, as it displaysPersonobject residing in theModel.
Logic component
API : Logic.java
Here’s a (partial) class diagram of the Logic component:

How the Logic component works:
- When
Logicis called upon to execute a command, it uses theAddressBookParserclass to parse the user command. - This results in a
Commandobject (more precisely, an object of one of its subclasses e.g.,AddCommand) which is executed by theLogicManager. - The command can communicate with the
Modelwhen it is executed (e.g. to add a person). - The result of the command execution is encapsulated as a
CommandResultobject which is returned back fromLogic.
The Sequence Diagram below illustrates the interactions within the Logic component for
the execute("delete i/T0123456A T0124563B") API call.
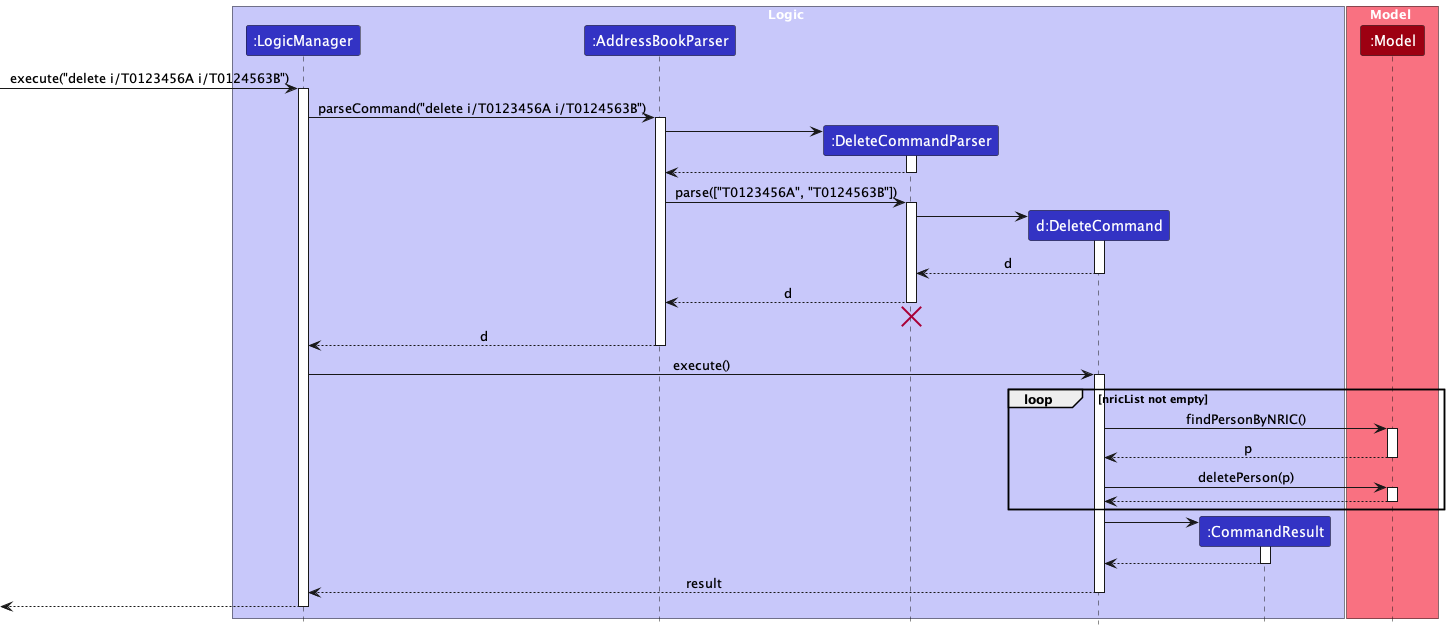
DeleteCommandParser should end at the destroy marker (X) but due to a limitation of PlantUML, the lifeline reaches the end of diagram.
[] refers to an ArrayList Object.
Here are the other classes in Logic (omitted from the class diagram above) that are used for parsing a user command:

How the parsing works:
- When called upon to parse a user command, the
AddressBookParserclass creates anXYZCommandParser(XYZis a placeholder for the specific command name e.g.,AddCommandParser) which uses the other classes shown above to parse the user command and create aXYZCommandobject (e.g.,AddCommand) which theAddressBookParserreturns back as aCommandobject. - All
XYZCommandParserclasses (e.g.,AddCommandParser,DeleteCommandParser, …) inherit from theParserinterface so that they can be treated similarly where possible e.g, during testing.
Model component
API : Model.java
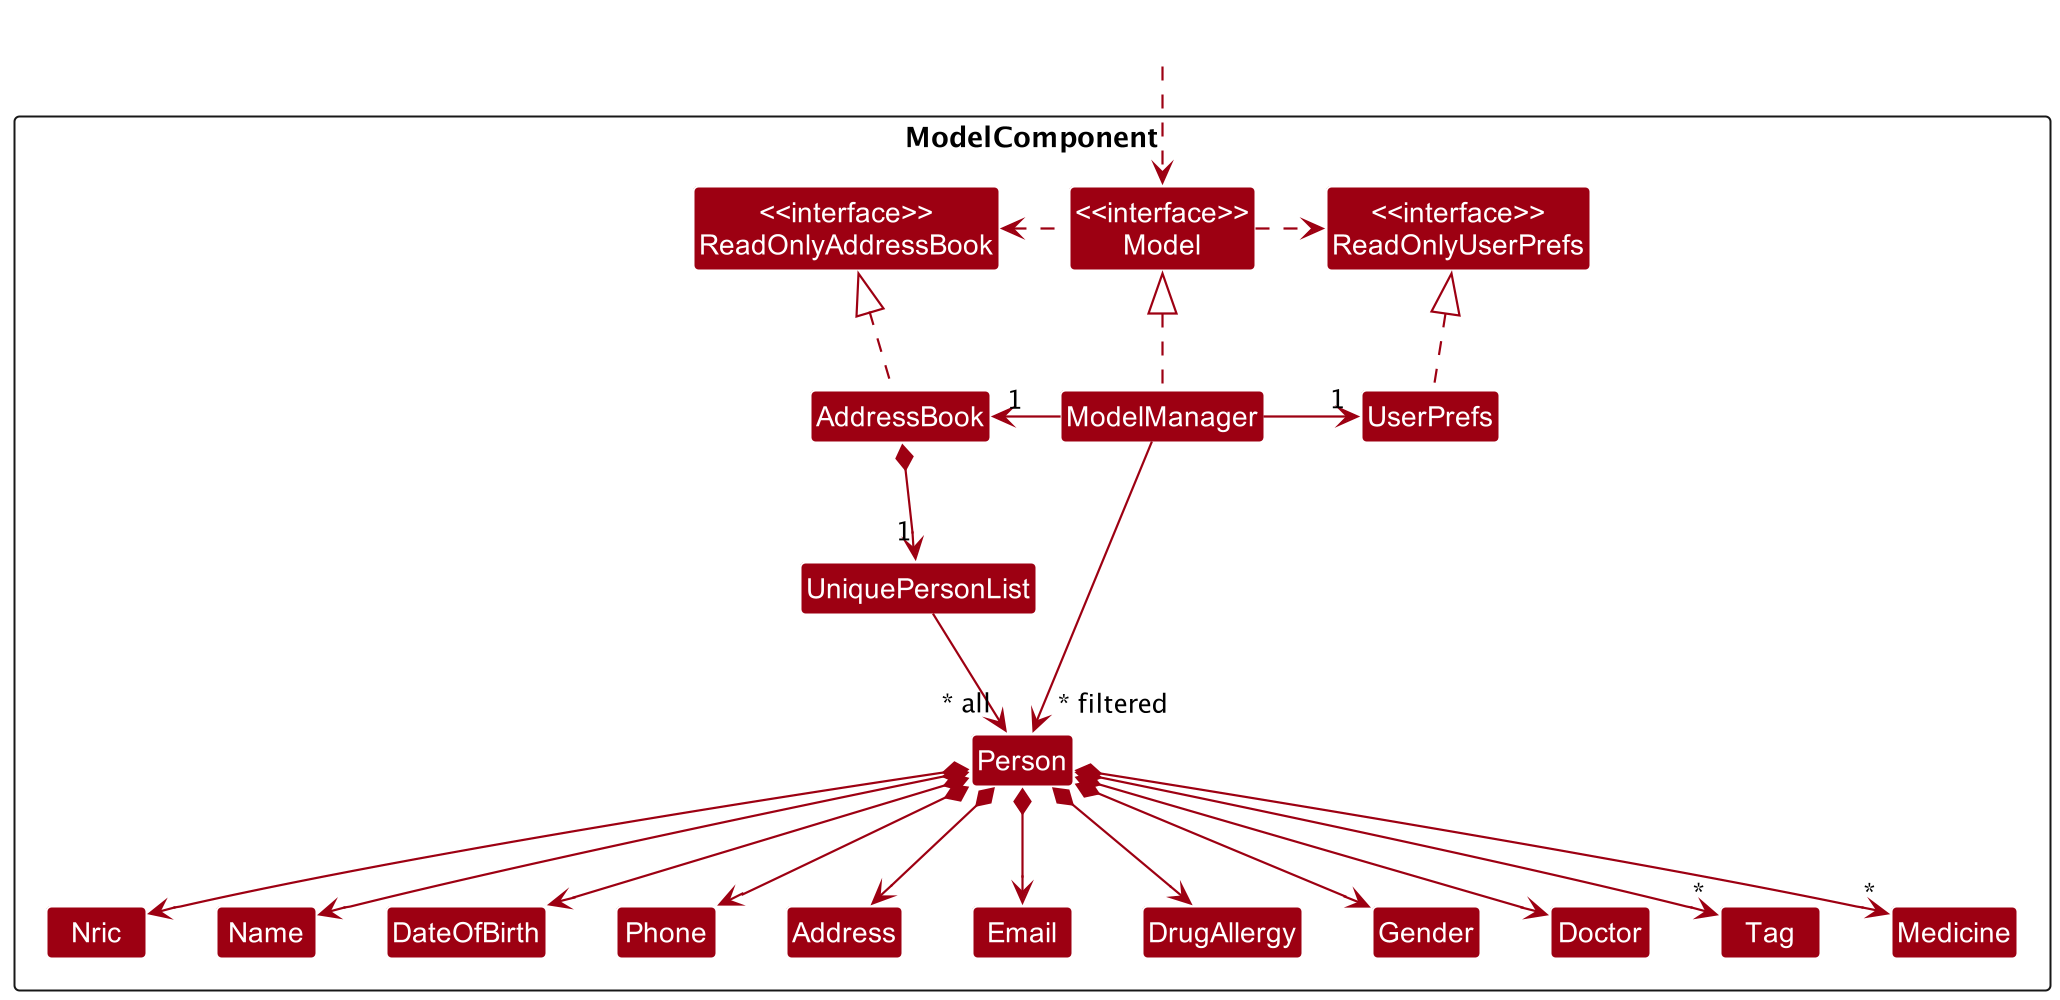
The Model component,
- stores the address book data i.e., all
Personobjects (which are contained in aUniquePersonListobject). - stores the currently ‘selected’
Personobjects (e.g., results of a search query) as a separate filtered list which is exposed to outsiders as an unmodifiableObservableList<Person>that can be ‘observed’ e.g. the UI can be bound to this list so that the UI automatically updates when the data in the list change. - stores a
UserPrefobject that represents the user’s preferences. This is exposed to the outside as aReadOnlyUserPrefobjects. - does not depend on any of the other three components (as the
Modelrepresents data entities of the domain, they should make sense on their own without depending on other components)
Tag list in the AddressBook, which Person references. This allows AddressBook to only require one Tag object per unique tag, instead of each Person needing their own Tag objects.
Storage component
API : Storage.java

The Storage component,
- can save both address book data and user preference data in json format, and read them back into corresponding objects.
- inherits from both
AddressBookStorageandUserPrefStorage, which means it can be treated as either one (if only the functionality of only one is needed). - depends on some classes in the
Modelcomponent (because theStoragecomponent’s job is to save/retrieve objects that belong to theModel)
Common classes
Classes used by multiple components are in the seedu.addressbook.commons package.
Implementation
This section describes some noteworthy details on how certain features are implemented.
Backup/Load feature
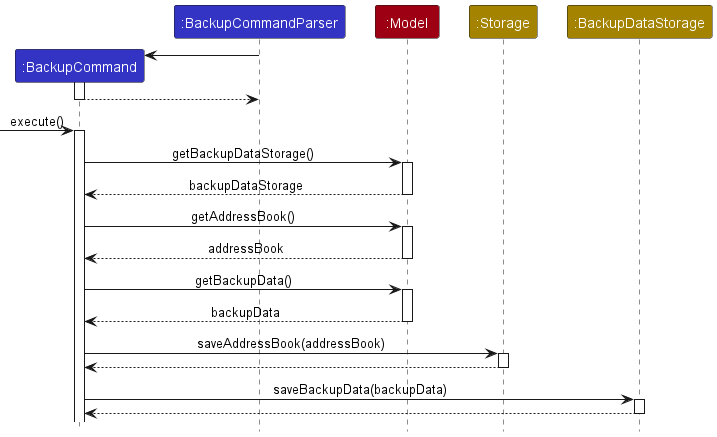
The backup feature is facilitated by BackupCommand. Upon execution, it creates a new Storage object. The current state of the address book, accessed via the model object, is then saved onto the hard disk via the storage object to a specified location (default: data/backup/…)
Steps of its execution are as follows:
-
BackupCommandParserparses user input and creates a new BackupCommand with a specifiedindexanddescription -
BackupCommandis then executed withexecute()- A new
Storageobject is created with the path of the backup file specified. - The current Addressbook data, retrieved via
Model.getAddressBook(), is now saved to the specified location via ` storage.saveAddressBook()` - A
BackupDataStorageobject is retrieved from the model using a getter method. The details of the backup are then saved into the hard disk usingBackupDataStorage.saveBackupData()
- A new
Undo/redo feature
Implementation
The proposed undo/redo mechanism is facilitated by VersionedAddressBook. It extends AddressBook with an undo/redo
history, stored internally as an addressBookStateList and currentStatePointer. Additionally, it implements the
following operations:
-
VersionedAddressBook#commit()— Saves the current address book state in its history. -
VersionedAddressBook#undo()— Restores the previous address book state from its history. -
VersionedAddressBook#redo()— Restores a previously undone address book state from its history.
These operations are exposed in the Model interface as Model#commitAddressBook(), Model#undoAddressBook()
and Model#redoAddressBook() respectively.
Given below is an example usage scenario and how the undo/redo mechanism behaves at each step.
Step 1. The user launches the application for the first time. The VersionedAddressBook will be initialized with the
initial address book state, and the currentStatePointer pointing to that single address book state.

Step 2. The user executes delete i/T1234567A command to delete the person with NRIC T1234567A. The delete command
calls Model#commitAddressBook(), causing the modified state of the address book after the delete i/T1234567A command executes
to be saved in the addressBookStateList, and the currentStatePointer is shifted to the newly inserted address book
state.

Step 3. The user executes add i/T1234567A … to add a new person. The add command also calls Model#commitAddressBook()
, causing another modified address book state to be saved into the addressBookStateList.

Model#commitAddressBook(), so the address book state will not be saved into the addressBookStateList.
Step 4. The user now decides that adding the person was a mistake, and decides to undo that action by executing
the undo command. The undo command will call Model#undoAddressBook(), which will shift the currentStatePointer
once to the left, pointing it to the previous address book state, and restores the address book to that state.

currentStatePointer is at index 0, pointing to the initial AddressBook state, then there are no previous AddressBook states to restore. The undo command uses Model#canUndoAddressBook() to check if this is the case. If so, it will return an error to the user rather
than attempting to perform the undo.
The following sequence diagram shows how the undo operation works:

UndoCommand should end at the destroy marker (X) but due to a limitation of PlantUML, the lifeline reaches the end of diagram.
The redo command does the opposite — it calls Model#redoAddressBook(), which shifts the currentStatePointer once
to the right, pointing to the previously undone state, and restores the address book to that state.
currentStatePointer is at index addressBookStateList.size() - 1, pointing to the latest address book state, then there are no undone AddressBook states to restore. The redo command uses Model#canRedoAddressBook() to check if this is the case. If so, it will return an error to the user rather than attempting to perform the redo.
Step 5. The user then decides to execute the command list. Commands that do not modify the address book, such
as list, will usually not call Model#commitAddressBook(), Model#undoAddressBook() or Model#redoAddressBook().
Thus, the addressBookStateList remains unchanged.

Step 6. The user executes clear, which calls Model#commitAddressBook(). Since the currentStatePointer is not
pointing at the end of the addressBookStateList, all address book states after the currentStatePointer will be
purged. Reason: It no longer makes sense to redo the add i/T1234567A … command. This is the behavior that most modern
desktop applications follow.

The following activity diagram summarizes what happens when a user executes a new command:

Add patient feature
Implementation
The implemented add mechanism is facilitated by AddCommandParser. It extends AddressBookParser and implements the
following operations:
-
AddCommandParser#parse()— Parses user input intoPersonand creates anAddCommandobject
These operations are exposed in the Model interface as methods with the same name e.g.
Model#addPerson().
Given below is an example usage scenario and how the add command works at each step
Step 1. A new patient visits the clinic/hospital and the clinic administrator registers the new patient in the patient records system.
Step 2. The administrator
executes add i/T0012345A n/John Doe p/98765432 a/John street, block 123, #01-01 d/NKDA g/Male e/johnd@example.com t/Diabetic
. The AddCommand is executed and Model#hasPerson is called and followed by a call to Model#addPerson()
which adds the record into the patient records system if the record does not already exist in the system.
Edit patient feature
Implementation
The implemented edit mechanism is facilitated by EditCommandParser. It extends AddressBookParser and implements the
following operations:
-
EditCommandParser#parse()— Parses user input intoINDEXandeditPersonDescriptorand creates anEditCommandobject
These operations are exposed in the Model interface as methods with the same name e.g.
Model#setPerson().
Given below is an example usage scenario and how the add command works at each step
Step 1. A patient visits the clinic/hospital and the clinic administrator registers the patient. The patient mentions that he has changed his phone number to 987654321.
Step 2. The administrator executes edit 1 p/987654321. The EditCommand is executed and Model#getFilteredPersonList
is called, then the parsed index is checked for validity followed by getting the patient record specified by the index.
Next, EditCommand#createEditedPerson is called, followed by calls to both Person#isSamePerson
and Model#hasPerson() to check for possible duplicates. Model#setPerson is called followed
by Model#updateFilteredPersonList()
which adds the record into the patient records system if the record does not already exist in the system.
View patient particulars feature
Implementation
The logic mechanism of this feature is the same as finding a patient by NRIC, but it will show all information of the patient on the view pane
including email, birthdate, drug allergies, and medicines. The view pane UI construction is similar to person card, which needs one Person as a parameter.
This operation could be activated by typing a command or double-clicking the patient card.
Given blow is an example usage scenario and how the view command works at each step
Step 1. The clinical/hospital administrator wants to see the detailed information of a patient with NRIC T1234567A
in order to know what medicine he/she used.
Step 2. The clinical/hospital administrator double-clicks the corresponding person card in the list panel or execute view i/T1234567A.
Then personal particulars of that patient will appear on the view pane.
Delete patient record by NRIC feature
Implementation
The implemented delete mechanism is facilitated by DeleteCommandParser. It extends AddressBookParser and implements
the following operations:
-
DeleteCommandParser#parse()— Parses user input intoArrayList<NRIC>and creates aDeleteCommandobject
These operations are exposed in the Model interface as methods with the same name e.g.
Model#deletePerson().
Given below is an example usage scenario and how the delete command works at each step
Step 1. The clinical/hospital administrator has been informed of death of 2 patients and their NRIC, T0123456A T0124563B.
Step 2. The administrator executes delete i/T0123456A i/T0124563B. The DeleteCommand is executed and for each NRIC
in the Set<NRIC>, Model#findPersonByNric() is called and followed by a call to Model#deletePerson()
which deletes the record in the system with the specified NRIC.
The following sequence diagram shows how the delete command works:

Design considerations:
Aspect: Deletion criteria
-
Alternative 1 (current choice): Deletion by
NRIC.- Pros: Very efficient as program will search for the record with specified
NRICand delete it. - Cons: Might be less convenient for clinical administrator to type out
NRICas compared to INDEX especially for the top few records displayed.
- Pros: Very efficient as program will search for the record with specified
-
Alternative 2: Deletion by INDEX.
- Pros: More convenient for clinical administrator to type out INDEX for the top few displayed records.
- Cons: If the record we are searching for does not appear in the top few records, we would have to execute a find command and then get corresponding INDEX to carry out deletion.
Filter patient record by attribute
Implementation
The implemented delete mechanism is facilitated by FindCommandParser. It extends AddressBookParser and implements
the following operations:
-
FindCommandParser#parse()— Parses user input into aPredicateobject according to thePrefixused. It then creates aFindCommandobject and passes thePredicateintoFindCommandobject.
These operations are exposed in the Model interface as Model#updateFilteredPersonList.
Given below is an example usage scenario and how the find command works at each step
Step 1. The clinical/hospital administrator has been informed of death of 2 patients and their NRIC, T0123456A T0124563B.
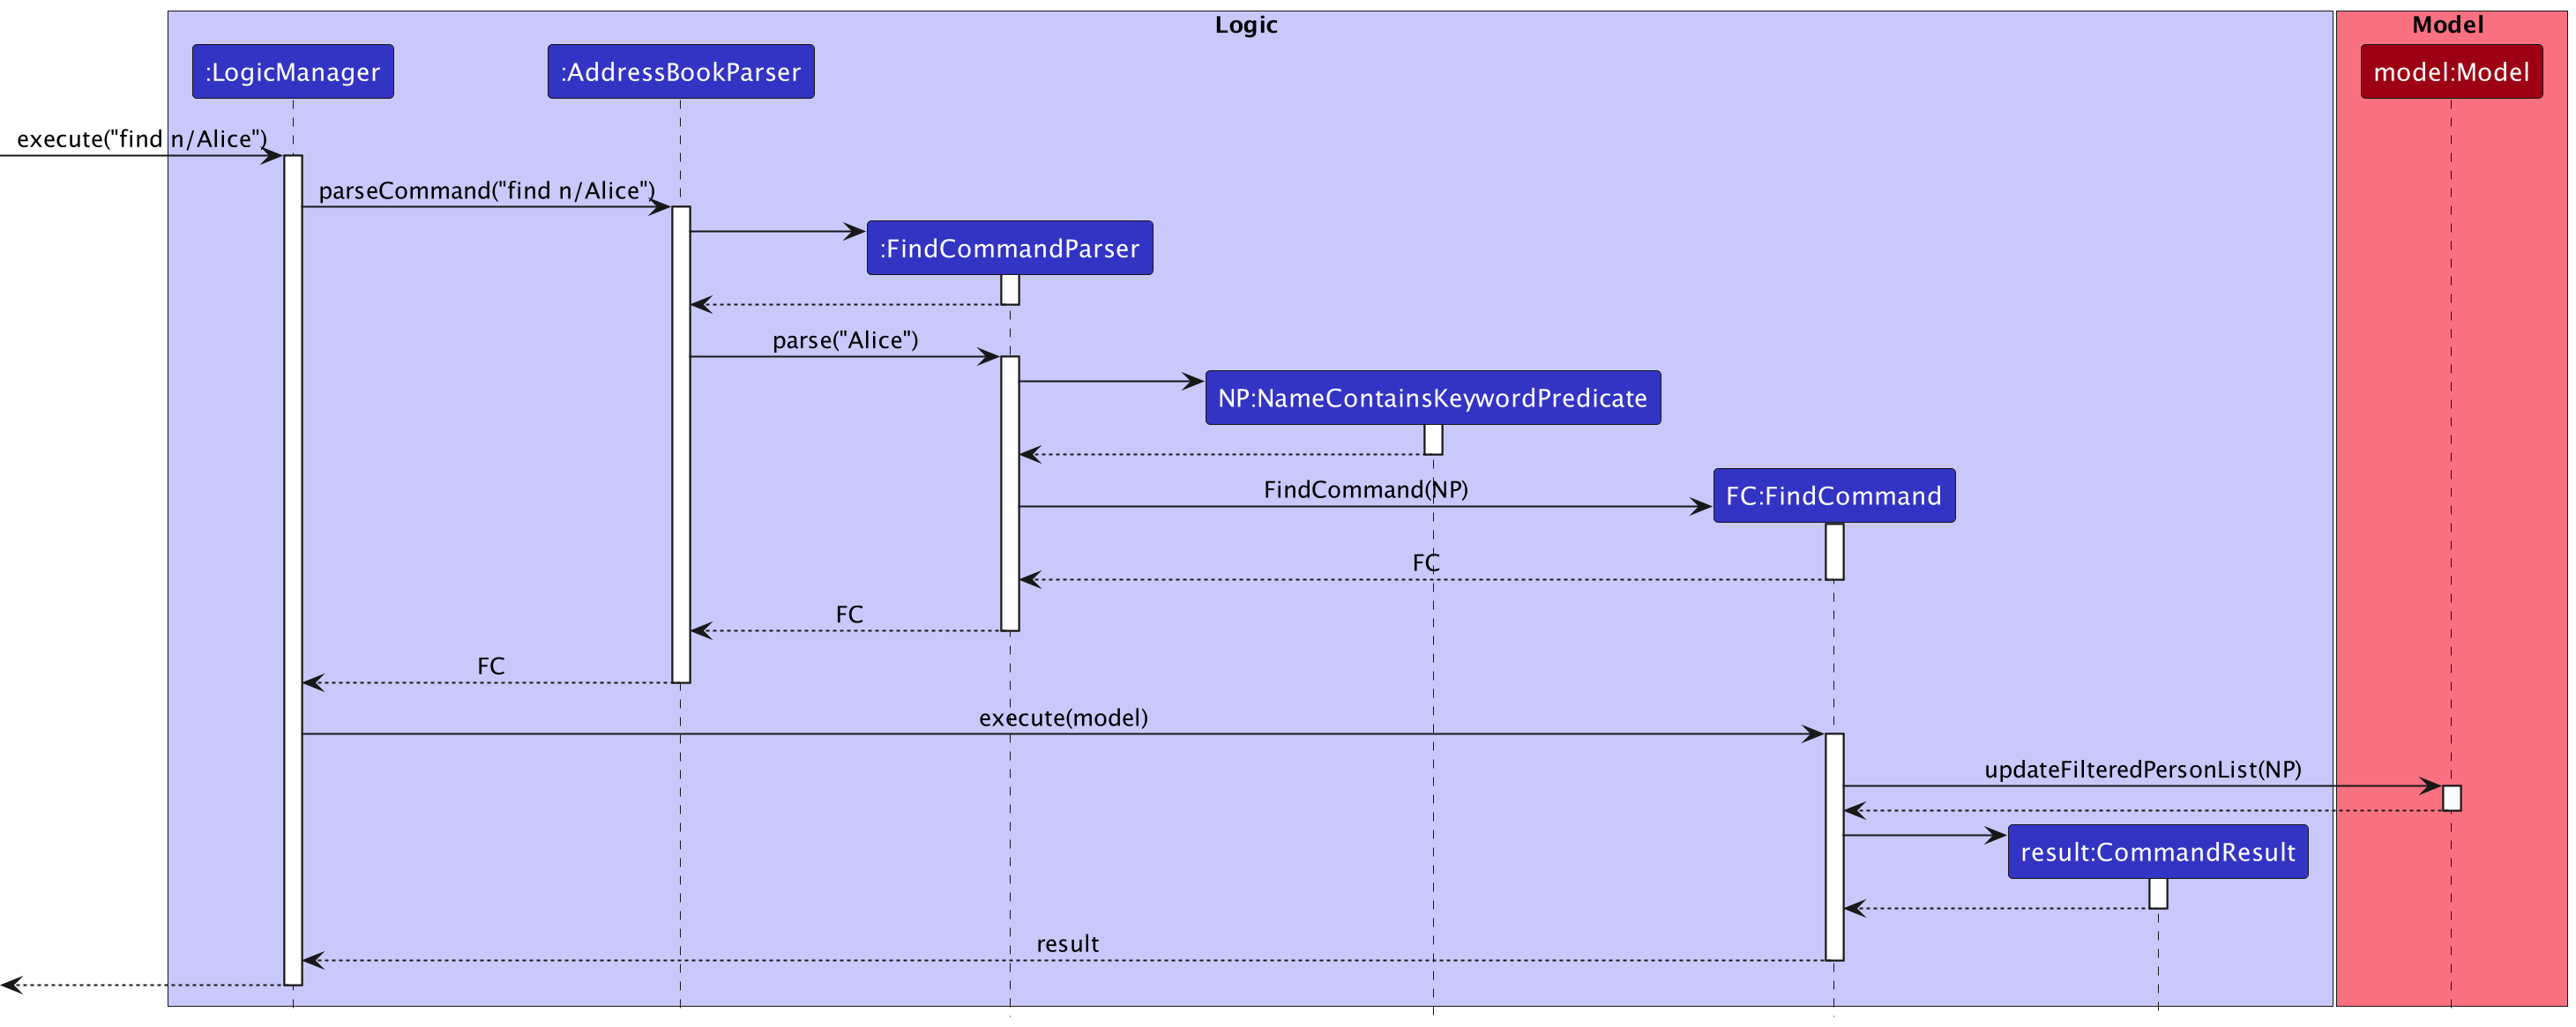
Step 2. The administrator executes find n/Alice. The model then creates a Predicate based on the provided prefix and
passes the Predicate as an argument when creating a FindCommand. The FindCommand will then be executed by the model
and it filters the list of person that matches the provided NAME.
The following sequence diagram shows how the find command works:
Design considerations:
Aspect: Filter criteria
-
Alternative 1 (current choice): Find by
NRIC,Name,Tag,Medicine,Doctor.- Pros:
- Very efficient as program will search for the record with specified
NRICand return the filtered person list - Allows clinical administrator to filter for frequently used
Medicineand stock up relevant supplies - Allows clinical administrator to filter for common health condition
Tagof patients at the clinic.
- Very efficient as program will search for the record with specified
- Cons:
- Might be less convenient for clinical administrator to type out
NRICas compared to INDEX especially for the top few records displayed. - clinical administrator might need to type more since the
Attributesto find by are generally longer in spelling.
- Might be less convenient for clinical administrator to type out
- Pros:
-
Alternative 2: Find by any
Attribute. Eg.Address,Phoneetc.- Pros: More convenient for clinical administrator to search by any attributes that he deem easy to type
- Cons: Unlikely for the clinical administrator to use other attributes to find a particular patient.
Light/dark Theme
Implementation
The theme is facilitated by Theme. It contains two modes which are light mode and dark mode. The light mode is closely
related to LightModeCommand and LightTheme.css. The dark mode is associated to DarkModeCommand and DarkTheme.css
. Moreover, two attributes (showLight and showDark) of CommandResult indicate what the current theme is.
Given below is an example usage scenario and how the light/dark mechanism behaves at each step.
Step 1. The user launches the application and the current theme is Dark.
Step 2. The user executes light command and the theme changed to light mode.
Step 3. The user clicks the Theme button above and select the Dark choice. The theme go back to the dark mode again.
Design considerations:
Aspect: How light & dark executes:
-
Alternative 1 (current choice): CSS file for Dark and Light separately.
- Pros: Easy to implement.
- Cons: More resource space and necessity to switch between two file paths.
-
Alternative 2: One CSS file containing the information of two modes.
- Pros: Less resource space and no need to change the file path.
- Cons: Not easy to implement and require more FXML changes.
Adding Nric as identifier
Implementation
The proposed Nric field is done similar to the implementation of the Name field.
Previously, name was used as the unique identifier for a Person object, where we check for equality between
two Person objects by name matching. As we acknowledge that in a clinical/hospital system, several patients may have
the same name, Nric was identified as a better unique identification choice.
The following additional constraints will be applied:
-
Nricwill be mandatory field when adding a newPerson. -
Nrichas to be in the following format:@xxxxxxx#-
@has to be one of the following:S,T,F,G, orM -
xxxxxxxis a 7-digit serial number, eachxcan be any number0-9 -
#can be any capital alphabetA-Z, and the field cannot be blank.
-
-
Nricmust be unique, the system will not allow the addition of a new person otherwise
Given below is an updated Model component diagram.

Design considerations:
Aspect: Mutability of Nric field:
-
Alternative 1 (current choice):
Nricis mutable.- Pros: Easy to make corrections if entered wrongly, no need to type the entire
addcommand again - Cons:
Nricnever changes for a person, it may not make sense to make it mutable.
- Pros: Easy to make corrections if entered wrongly, no need to type the entire
-
Alternative 2:
Nricis immutable.- Pros: Will ensure no tampering of identifier for a
Personobject. - Cons: If
Nricis wrongly entered, user will have to re-type the entireaddcommand.- This can have heavier consequences if much more data is added before the mistake is noticed.
- Pros: Will ensure no tampering of identifier for a
Adding Date Of Birth
The proposed DateOfBirth field is done similar to the implementation of the Name field.
E.g., 12 April 2000, 1 January 2001
The addition of this field will allow staff to quickly filter by date of birth, or quickly glance at a patient to verify identity.
Design considerations:
Aspect: Implementing a new object to represent DateOfBirth:
-
Alternative 1 (current choice): Convert
DateOfBirthgiven in the formatdd/mm/yyyytodd month yyyy.- Pros: User does not have to type the full date in string when adding a person.
- Cons: It might be messy when adding a person since there will be more
/.
-
Alternative 2: User have to type in the full date when adding a person.
- Pros: It will not be as messy since there will be less
/when adding a person. - Cons: User will have to type more which might result in more errors when adding a person.
- Pros: It will not be as messy since there will be less
Adding Health Conditions
The proposed implementation of separate Conditions object to encapsulate health conditions of a patient.
E.g., Diabetic, Dyslexic, Osteporotic.
The addition of this field will allow staff to quickly filter by conditions, or quickly glance at a patient to identify what known conditions he/she has.
Design considerations:
Aspect: Implementing a new object to represent Conditions:
-
Alternative 1 (current choice): Convert
Tagobjects to health conditions.- Pros: The
Tagobject originally implemented in AB3 currently does not have much meaning in the context of HospiSearch. The highlighting of the tags can be repurposed to show a quick view of known conditions a patient has. - Cons: If a patient has many pre-existing conditions, this may end up as visual clutter. Furthermore, we may wish for other details to be highlighted instead of health conditions.
- Pros: The
-
Alternative 2: Implement
Conditionsas a separate object- Pros: We can still tag a patient with details other than health conditions. The functionality of
Tagwill not be deprecated. - Cons: This will require more restructuring of the codebase, the location to display health conditions may not be as obvious as well compared to the current display of tags.
- Pros: We can still tag a patient with details other than health conditions. The functionality of
Adding Gender
The proposed Gender field is done similar to the implementation of the Name field.
E.g., Male, Female, Others
The addition of this field will allow staff to quickly verify the gender of a patient.
Design considerations:
Aspect: Implementing a new object to represent Gender:
-
Alternative 1 (current choice): Gender is restricted to
Male,Female,Others.- Pros: There will only be 3 categories to classify a person.
- Cons: Cannot represent other genders.
Adding Attending Doctor
The proposed implementation of separate Doctor object to encapsulate the current attending doctor of a patient.
The addition of this field will allow staff to quickly filter by attending doctor, or quickly glance at a patient to identify what doctor is in charge of him/her.
Design considerations:
Aspect: Implementing a new object to represent conditions:
-
Alternative 1 (current choice): Have the
doctorfield function similar to thenamefield.- Pros: More flexibility, in terms of tagging patients to doctors
- Cons: Will have to ensure no ambiguous
doctornames, e.g., if there are twodoctors namedBen, we will have to include their surname to differentiate.
-
Alternative 2: Have a separate encapsulation for
doctorwhere we record doctors as persons as well, then link each patient to adoctor’s nric.- Pros: Less ambiguity, we can navigate to the specific
doctor. - Cons: This will require more restructuring of the codebase, storing both doctors and patients, which makes the database more messy.
- Pros: Less ambiguity, we can navigate to the specific
Documentation, logging, testing, configuration, dev-ops
Appendix: Requirements
Product scope
Target user profile:
- has a need to manage a significant number of contacts
- prefer desktop apps over other types
- can type fast
- prefers typing to mouse interactions
- is reasonably comfortable using CLI apps
Value proposition: HospiSearch is a comprehensive hospital records management system designed to streamline administrative tasks and improve patient care. With our app, you can easily store, retrieve, and manage patient records, appointment schedules, and billing information all in one place
User stories
Priorities: High (must have) - * * *, Medium (nice to have) - * *, Low (unlikely to have) - *
| Priority | As a … | I want to … | So that I can… |
|---|---|---|---|
* * * |
new user | see the user guide | know about all functions |
* * * |
new user | access a help menu | know about all commands |
* * * |
admin | add patients’ records | keep track of their information |
* * * |
admin | edit patients’ records | update their information |
* * * |
admin | view a patient particulars | have an overall understanding of the patient |
* * * |
admin | delete patients’ records | free up space for other patient records |
* * |
admin | list all patients | have an overview |
* * |
admin | search for a patient record | find the needed information quickly |
** |
admin | backup data | backup data in the event of a primary data failure |
** |
admin | load data | load data in the event of a primary data failure |
** |
admin | undo commands | roll back current state if I made a unintended command |
** |
admin | redo commands | roll back current state if I made an unintended redo |
* |
admin | clear data | start the database from scratch |
Use cases
(For all use cases below, the System is the HospiSearch and the Actor is the user, unless specified
otherwise)
Use case: UC1 - Add patient to system
MSS
- Administrator types add command together with the patient details (NRIC, age, gender, medicine usage, health conditions).
- HospiSearch adds the patient to the system. Use case ends.
Extensions
-
1a. HospiSearch detects an error in the entered patient details or missing patient details.
1a1. HospiSearch requests for the correct data. 1a2. Administrator enters the new data. Steps 1a1-1a2 are repeated until the data entered are correct. Use case resumes at step 2.
Use case: UC2 - Edit patients’ details
MSS
- Administrator requests to update a patients’ details and enters the updated information.
- HospiSearch updates the patient’s record in the system. Use case ends.
Extensions
-
1a. HospiSearch detects an error in the updated information.
1a1. HospiSearch requests for the correct data. 1a2. Administrator enters the new data. Steps 1a1-1a2 are repeated until the data entered are correct. Use case resumes at step 2.
Use case: UC3 - Help Administrator obtain information on HospiSearch
MSS
- Administrator is new to the system and requests for help.
- HospiSearch gives a list of all possible commands together with brief descriptions to guide the user. Use case ends.
Use case: UC4 - Clear all data
MSS
- Administrator requests to clear all data in the system.
- HospiSearch clears all the data in the system. Use case ends.
Use case: UC5 - Search for patients by address
MSS
- Administrator wants to search for patient by his address
- HospiSearch provides a list of all people staying in the given address
Extensions
- 1a. No such patient has the specified address. Use case ends.
Use case: UC6 - Search for patients by medicine
MSS
- Administrator requests for a list of patients using a certain type of medicine as he wants to stock up on medicine.
- HospiSearch provides a list of patients using the specified type of medicine. Use case ends.
Extensions
- 1a. There are no patients using the specified type of medicine in HospiSearch system. Use case ends.
Use case: UC7 - Get patient by NRIC
MSS
- Administrator wants to get patient details’ based on the patient’s NRIC.
- HospiSearch provides the details of the patient with the specified NRIC. Use case ends.
Extensions
- 1a. There is no such patient with specified NRIC in the HospiSearch system. Use case ends.
Non-Functional Requirements
- Should work on any mainstream OS as long as it has Java
11or above installed. - Should be able to hold up to 1000 persons without a noticeable sluggishness in performance for typical usage.
- Should be able to produce find results in less than 3 seconds for a database of less than 10000 user information.
- A user with above average typing speed for regular English text (i.e. not code, not system admin commands) should be able to accomplish most of the tasks faster using commands than using the mouse.
Glossary
- Mainstream OS: Windows, Linux, Unix, OS-X
- Private contact detail: A contact detail that is not meant to be shared with others
Appendix: Instructions for manual testing
Given below are instructions to test the app manually.
Launch and shutdown
-
Initial launch
-
Download the jar file and copy into an empty folder
-
Double-click the jar file Expected: Shows the GUI with a set of sample contacts. The window size may not be optimum.
-
-
Saving window preferences
-
Resize the window to an optimum size. Move the window to a different location. Close the window.
-
Re-launch the app by double-clicking the jar file.
Expected: The most recent window size and location is retained.
-
Adding a person
- Adding a person to HospiSearch
- Prerequisites: Current person (identified by
Nric) does not exist in the database - Test
case:
add i/S1234567A n/John Doe dob/28/12/2001 p/98765432 e/johnd@example.com a/311, Clementi Ave 2, #02-25 g/Male d/NKDA ad/Mary
Expected: person above is added to HospiSearch, provided another entry does not have the samenric. Timestamp in the status bar is updated. - Test case:
add n/John Doe dob/28/12/2001 p/98765432 e/johnd@example.com a/311, Clementi Ave 2, #02-25 g/Male d/NKDA ad/Mary
Expected: No person is added. Error details shown in the status message. Status bar remains the same. - Test case:
add i/S1234567A dob/28/12/2001 p/98765432 e/johnd@example.com a/311, Clementi Ave 2, #02-25 g/Male d/NKDA ad/Mary
Expected: No person is added. Error details shown in the status message. Status bar remains the same. - Test case:
add John Doe S1234567A 28/12/2001 98765432 johnd@example.com 311, Clementi Ave 2, #02-25 Male NKDA ad/Mary
Expected: No person is added. Error details shown in the status message. Status bar remains the same. - Other incorrect add commands to try:
add,add x/...,...(where x is some invalid tag)
- Prerequisites: Current person (identified by
Deleting a person
-
Deleting a person while all persons are being shown
-
Prerequisites: List all persons using the
listcommand. Multiple persons in the list. -
Test case:
delete i/S1234567A
Expected: Patient record with the specified NRIC will be removed if the person exists in the list. -
Other incorrect delete commands to try:
delete,delete x,...(where x is larger than the list size)
Expected: Similar to previous.
-
Finding a person
-
Finding a person while all persons are being shown
-
Prerequisites: List all persons using the
listcommand. Multiple persons in the list. -
Test case:
find i/S1234567A
Person with the exact matching NRIC will be shown. It is case-insensitive. -
Test case:
find n/JAMES
Persons with names containing the string ‘james’ will be shown. It is case-insensitive. -
Test case:
find t/diabetic
Persons withdiabetictags will be shown. It is case-insensitive. -
Test case:
find m/panadol
Persons that have been prescribedpanadolwill be shown. It is case-insensitive. -
Test case:
find n/
Expected: No particular string has been input after the given prefix. Error details shown in the status message. Status bar remains the same. -
Test case:
find n/ t/
Expected: Multiple attributes have been input. Error details shown in the status message. Status bar remains the same. -
Other incorrect delete commands to try:
find,find x(no prefix have been given),
find n/ i/,find n/ m/ i/,...
Expected: Similar to previous wrong commands.
-
-
Returning to the full list of persons
- List all persons using the
listcommand to return back to the full list of persons in the database.
- List all persons using the
Saving and Loading data
- Saving current state of HospiSearch
- Prerequisites: There are 1 or more patient records in HospiSearch.
The following test cases should be executed sequentially (one after the other)/ - Test case 1.1:
backup 1, thenviewbackups
Expected: Current state is saved in backup slot 1. - Test case 1.2:
delete i/x, (replace x withnricof the first patient), thenload 1Expected: The state of HospiSearch should be as if thedeletecommand was not executed.
- Prerequisites: There are 1 or more patient records in HospiSearch.
Viewing a patient’s record
- Viewing a particular patient’s record
- Prerequisites: There are 1 or more patient records in HospiSearch.
- Test case:
view i/S1234567A
Expected: View pane will reflect the patient with the matchingnricalongside all his/her attributes.
- Prerequisites: There are 1 or more patient records in HospiSearch.
Changing between themes
- Changing to light/dark mode
-
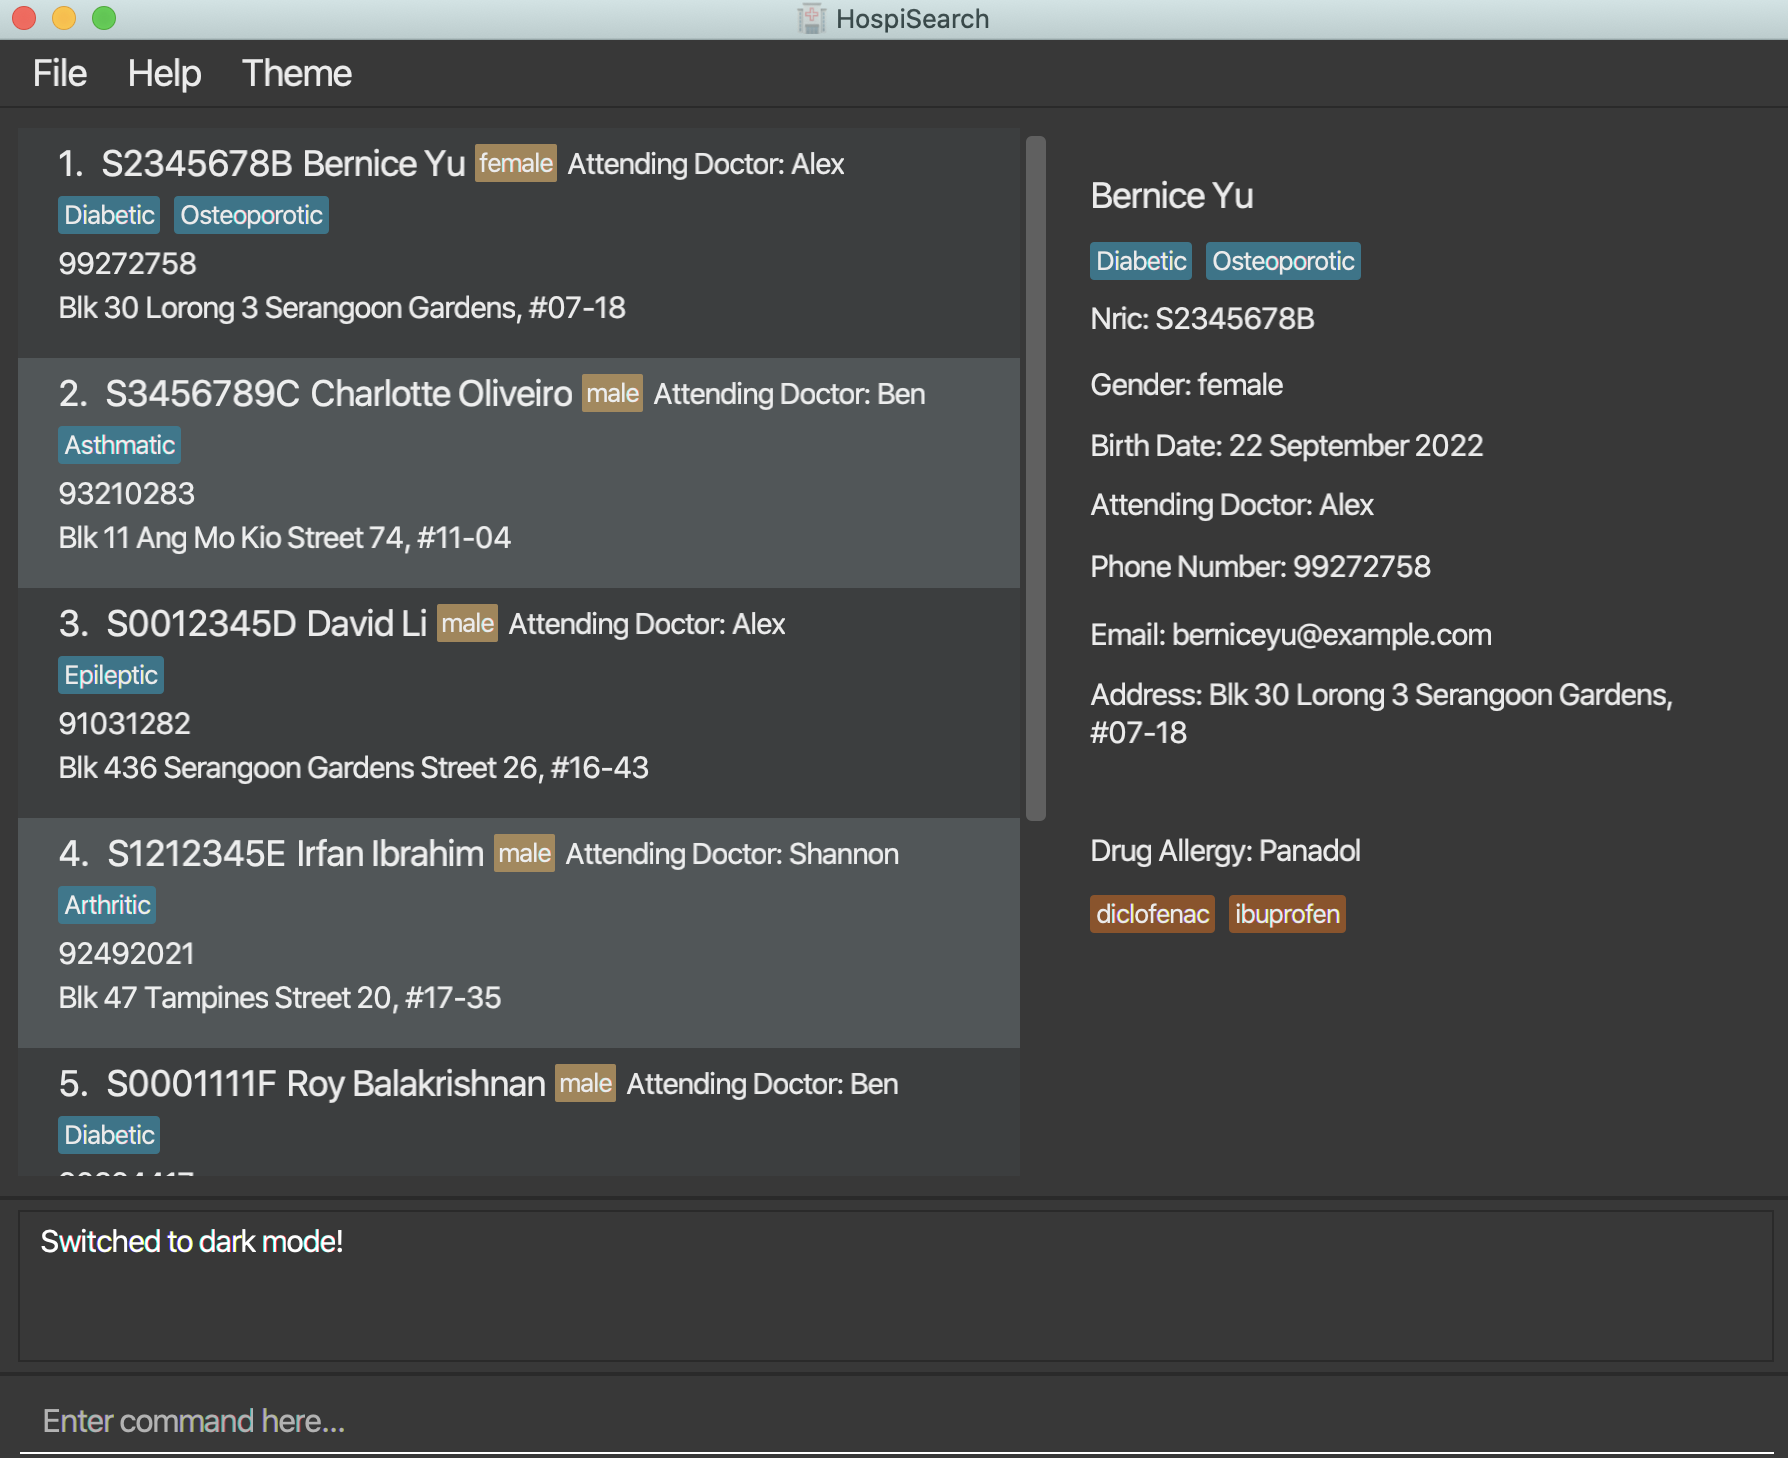
Test case:
dark
The theme changes to dark theme as shown below.
-
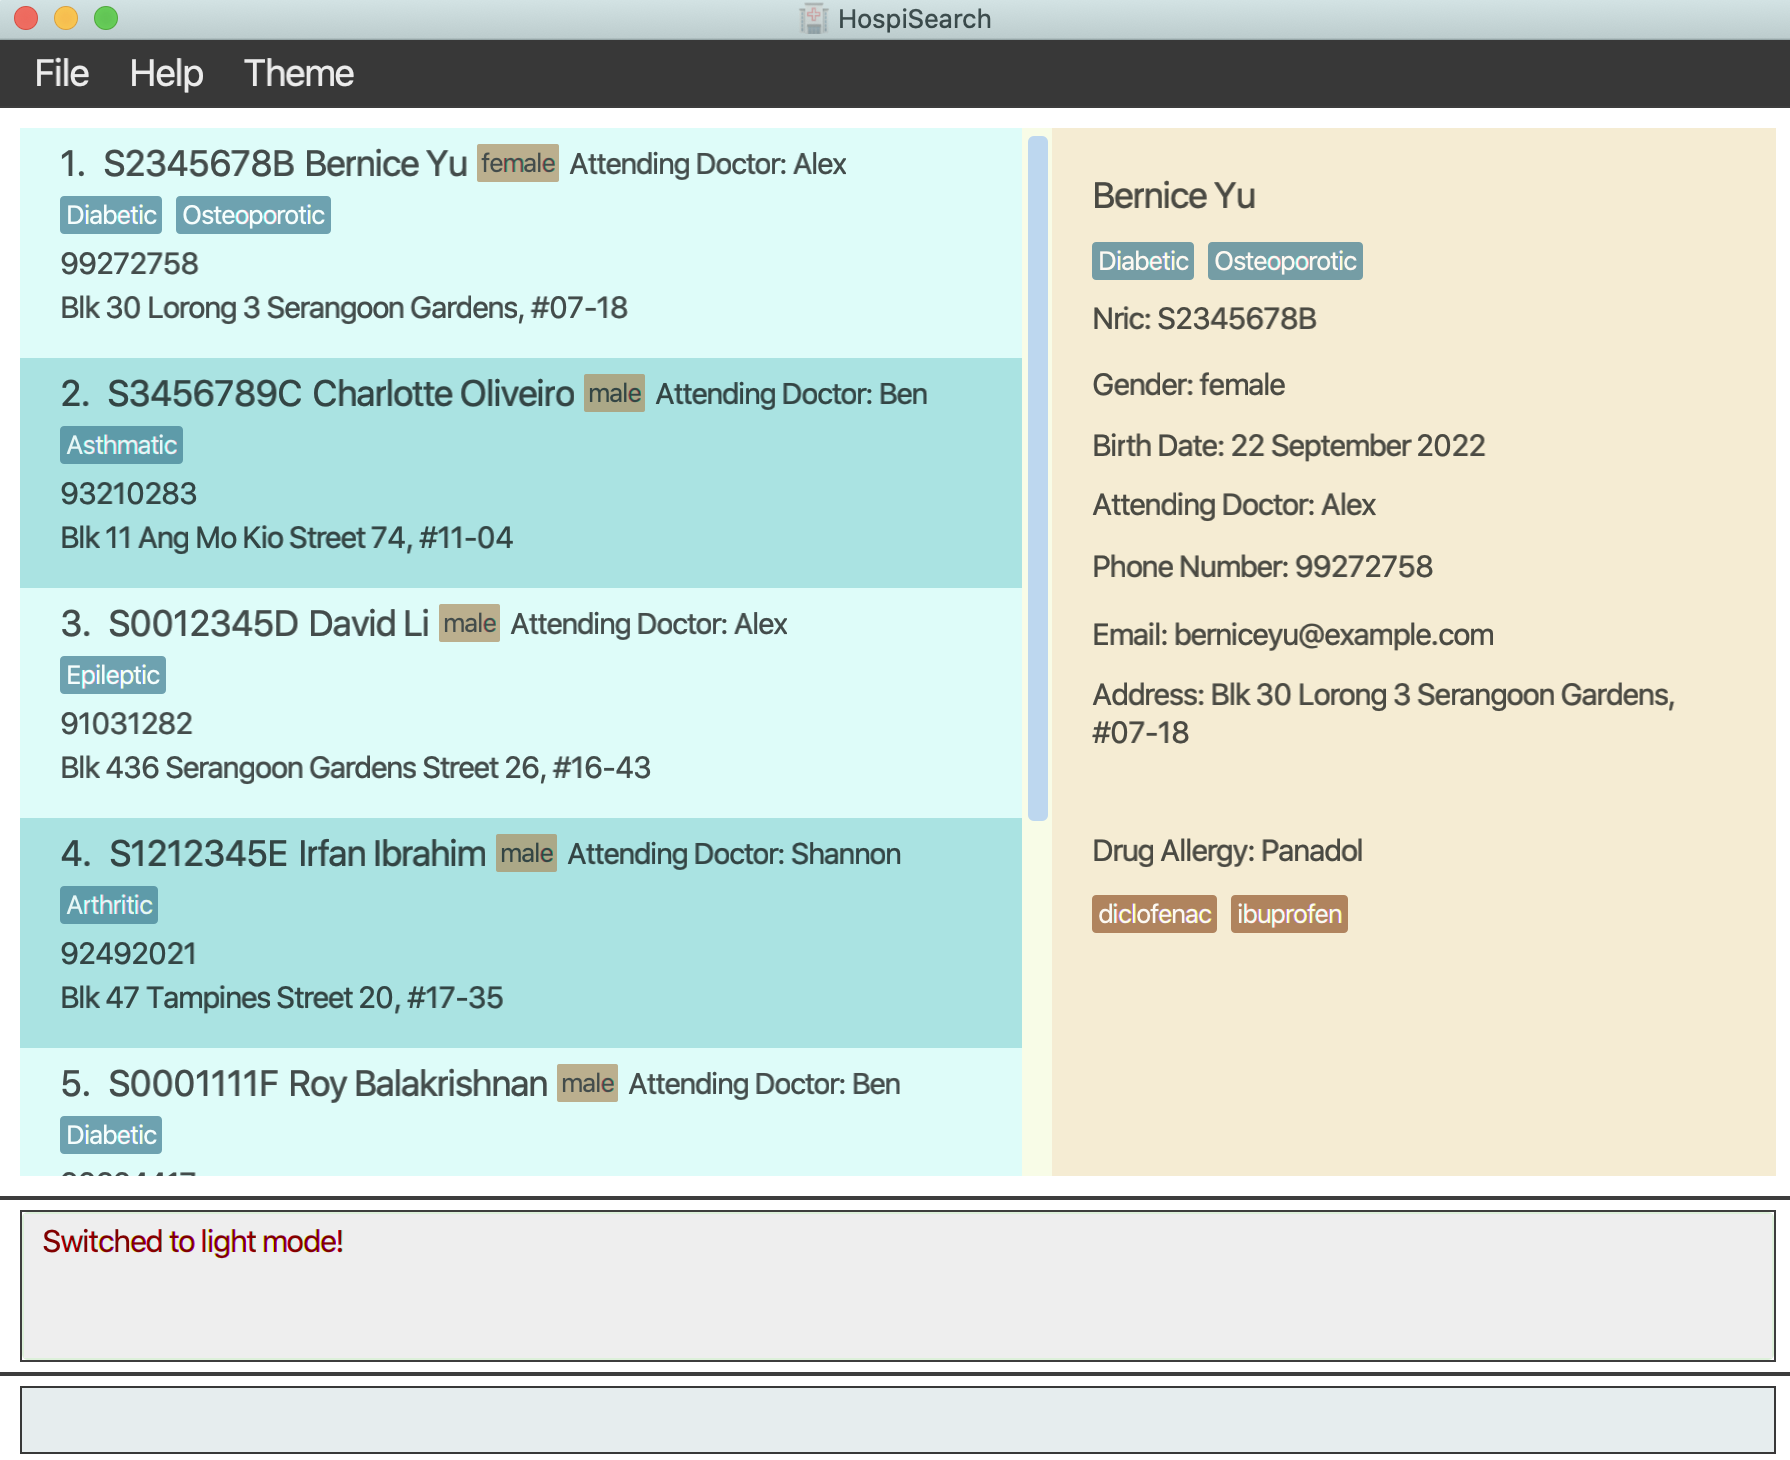
Test case:
light
The theme changes to light theme.
-
Appendix: Planned Enhancements
-
At present, a user has the option to enter an individual’s
nricnumber in the future, such as adding a person withnricstarting with T99, despite the year 2099 being in the future. We intend to implement a feature that will validatenrics and generate an error messagePlease input a valid NRICshould annricfrom the future be inputted. -
Currently, a user is able to input a
DateOfBirthwith a year that is in the future. In the future, We plan to make it such that we will check for future dates inputted asDateOfBirthand generate an error messageOnly dates that have occurred are valid inputs. -
Currently, a user is unable to input
Medicines that contain non-alphanumeric characters.In the future, we plan to make it such that you can inputMedicines with non-alphanumeric characters such as “retin-A”. -
Currently, you are unable to input
Names that contain non-alphanumeric characters.In the future, we plan to make it such that you can inputNames with non-alphanumeric characters such as “s/o”. -
Currently, whenever a user
viewsa person, the scroll bar will bring you back to the very top of the list of patients. In the future, we will ensure tha the scroll bar remains in position even after running aviewcommand. -
Currently, when adding a person, if the user misses out on a prefix, a generic invalid format command will be generated in the result display box. In the future, we will inform the user of the missing prefix in the result display box.
-
Currently, users are only able to use the undo/redo functions for actions that modify data. This excludes commands
light,dark,backupanddeletebackup. In the future, we plan to extend the capabilities of the undo/redo functions to encompass all commands in the future. -
Currently, the error message of falsely deleting a backup file is too generic and doesn’t provide any indication. In the future, a more specific and informative error message related to the backup file will be provided to guide the user clearly.