User Guide
Introduction
Streamline your patient management with lightning-fast efficiency using HospiSearch
HospiSearch is a desktop app for managing hospital/clinic patients’ particulars, optimized for use via a Command Line Interface (CLI) while still having the benefits of a Graphical User Interface (GUI). HospiSearch can also help you complete your patient management tasks faster than traditional GUI apps, regardless of your typing speed.
Our target audience is hospital and clinical administrative staff who deal with the management of large physical patient records and seek a more efficient and streamlined solution. Our app provides them with the ability to add, edit, delete, filter patient records and so much more.
About this Guide
The purpose of this user guide document is to provide staff with a clear understanding of the features and benefits of HospiSearch. The guide aims to assist users in effectively utilizing HospiSearch’s features to streamline their patient management tasks and improve overall efficiency.
💡Tip:
Messages in this format include information that may be useful to the user.
Table of Contents:
- Setup
- GUI Information
- Command Prefixes
-
Features
-
Add patient:
add -
Edit patient:
edit -
View patient particulars:
view -
Delete patient:
delete -
Filter patients:
find -
List all patients:
list -
Backup patient records:
backup -
Load backups:
load -
View backups:
viewbackups -
Delete backups:
deletebackup -
Clear all data:
clear -
Light mode:
light -
Dark mode:
dark -
Undo:
undo -
Redo:
redo -
Help:
help
-
Add patient:
- FAQ
- Command Summary
- Glossary
Setup
-
Ensure you have Java
11or above installed in your Computer. -
Download the latest
HospiSearch.jarfrom here. -
Copy the file to the folder you want to use as the home folder for HospiSearch.
-
Open a command terminal,
cdinto the folder you put the jar file in, and use thejava -jar hospisearch.jarcommand to run the application.
Note:
- For Mac Users:
- Click on the Finder icon in the Dock (the bar of icons at the bottom of the screen).
- Click on Applications in the left-hand sidebar.
- Open the Utilities folder.
- Double-click on the Terminal application to launch the command terminal.
- For Windows Users:
- Click on the Start button in the bottom left corner of the screen.
- Type command prompt into the search bar.
- Click on the Command Prompt application that appears in the search results to launch the command terminal.
A GUI similar to the one below should appear in a few seconds. Note how the app contains some sample data.
- Type in a command in the command box to execute it. Some commands to try:
-
helpopens up the help menu.
-
- Refer to the Features below for details of each command.
Note: HospiSearch is compatible with Windows, MacOS and Ubuntu.
GUI Information

Command Prefixes
| Patient Record Field | Prefix |
|---|---|
| NRIC | i/ |
| Date Of Birth | dob/ |
| Name | n/ |
| Phone | p/ |
| Gender | g/ |
| Doctor | ad/ |
| e/ | |
| Address | a/ |
| Tag | t/ |
| Drug Allergy | d/ |
| Medicine | m/ |
| Backup description | b/ |
Features
Notes:
-
Input words in
UPPER_CASEare the parameters to be supplied by the user. e.g. inadd n/NAME,NAMEis a parameter which can be used asadd n/John Doe. -
Commands in square brackets are optional. e.g.
n/NAME [t/TAG]can be used asn/John Doe t/friendor asn/John Doe. -
Commands separated by
|within()suggest that only one of the commands must be present to be valid. -
Items with
…after them can be used multiple times, including zero. e.g., [t/TAG] … can be used (i.e. 0 or more times), t/friend t/family etc. -
Parameters can be in any order. e.g. if the command specifies
n/NAME p/PHONE_NUMBER,p/PHONE_NUMBER n/NAMEis also acceptable. -
Extraneous parameters for commands that do not take in parameters (such as
help,list,exitandclear) will be ignored. e.g., if the command specifieshelp 123, it will be interpreted ashelp.
find is valid, but FIND or FinD is considered as invalid. Keywords following commands do
not need to be in lower case.
Adding a patient record: add
Let’s say a patient is visiting your clinic for the first time! Use the add command to add the patient records to the record list.
Format: add i/NRIC n/NAME dob/DATE OF BIRTH p/PHONE a/ADDRESS d/DRUGALLERGIES g/GENDER ad/DOCTOR [e/EMAIL] [t/TAG]… [m/MEDICINE]…
💡Tip:
The drug allergies field is required however if the patient you are registering does not have any drug allergies, type in NKDA(No Known Drug Allergies)
A patient can have any number of tags and medicine (including 0).
A patient can leave out the email prefix should they not want to share it.
Examples:
add i/T0012345A n/John Doe dob/20/12/2000 p/98765432 a/John street, block 123, #01-01 d/NKDA g/male ad/Alex t/Diabetic m/Lantusadd i/T0012345B n/Betsy Crowe dob/18/12/1998 p/1234567 a/Newgate Prison d/Panadol g/female ad/Shannon e/betsycrowe@example.com t/Dyslexic
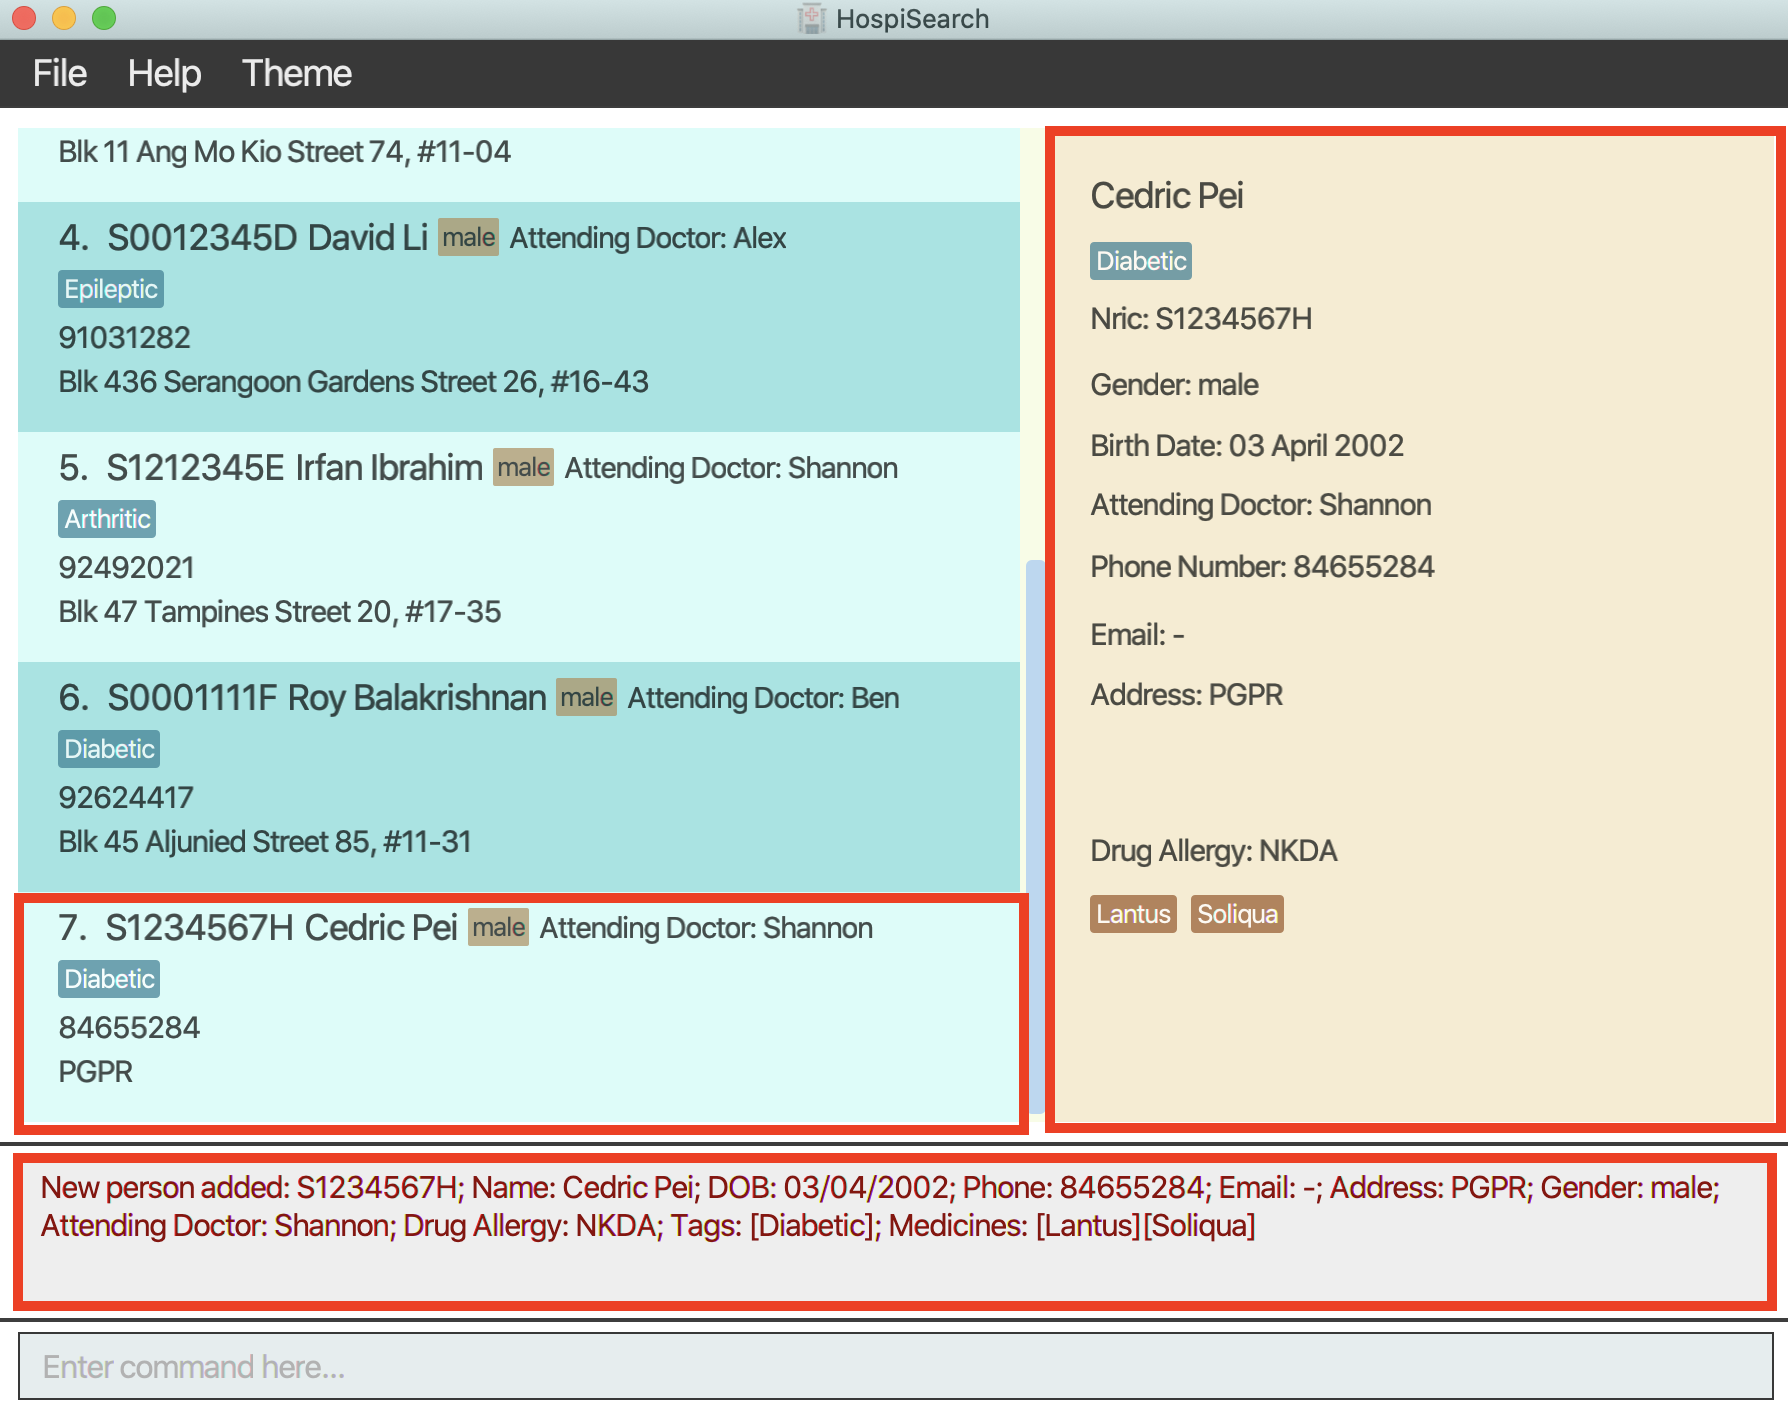
Above is the execution result of the input add i/S1234567H n/Cedric Pei dob/03/04/2002 p/84655284 a/PGPR g/male d/NKDA ad/Shannon t/Diabetic m/Lantus m/Soliqua.
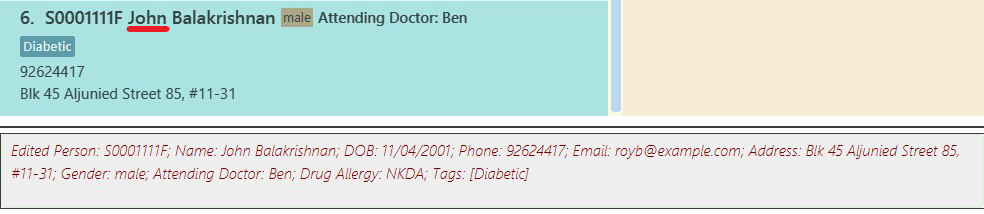
Editing a patient record: edit
Let’s say a patient has moved to a different address or undergone significant changes in their medical history. Use the edit command to edit their personal particulars.
Format: edit INDEX [i/NRIC] [n/NAME] [dob/DATE OF BIRTH] [p/PHONE] [e/EMAIL] [a/ADDRESS] [d/DRUGALLERGIES] [g/GENDER] [ad/DOCTOR] [t/TAG]… [m/MEDICINE]…
💡Tip:
You can remove all the patient’s tags/medicine by typing t/ or m/ respectively, without specifying any tags/medicine after it.
Examples:
-
edit 1 p/91234567 e/johndoe@example.comedit the phone number and email address of the patient at index 1 to be 91234567 and johndoe@example.com respectively.
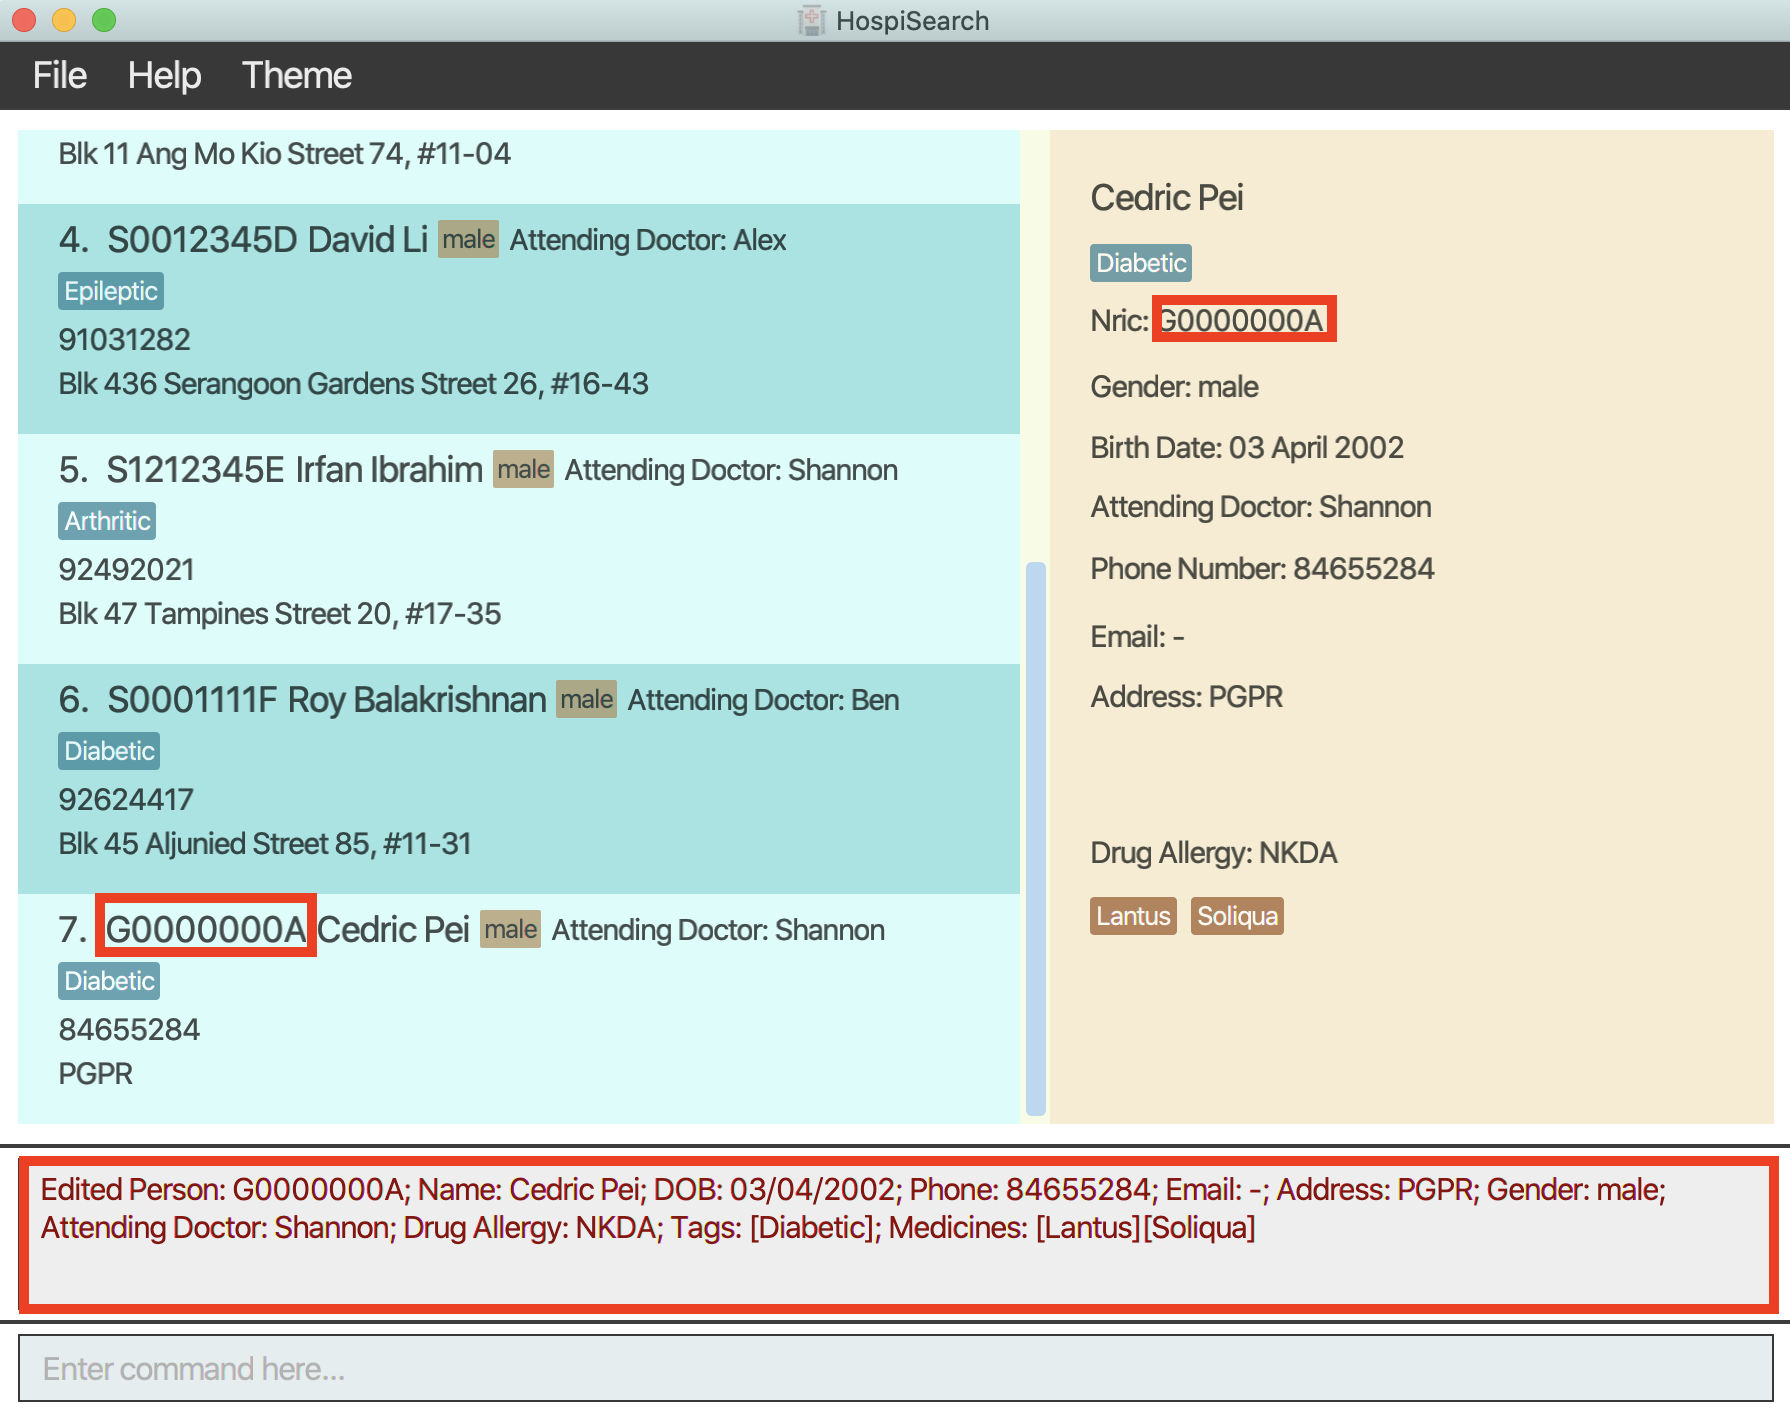
Above is the execution result of the input edit 7 i/G0000000A.
Viewing a patient detailed particulars: view
To reduce clutter, we have placed the more in-depth information of a patient in the view panel to the right of the patient list.
Use the view command to view these additional details of a patient.
Format : view i/NRIC
Examples:
-
view i/G0000000Ashows detailed information about the patient on the view pane.
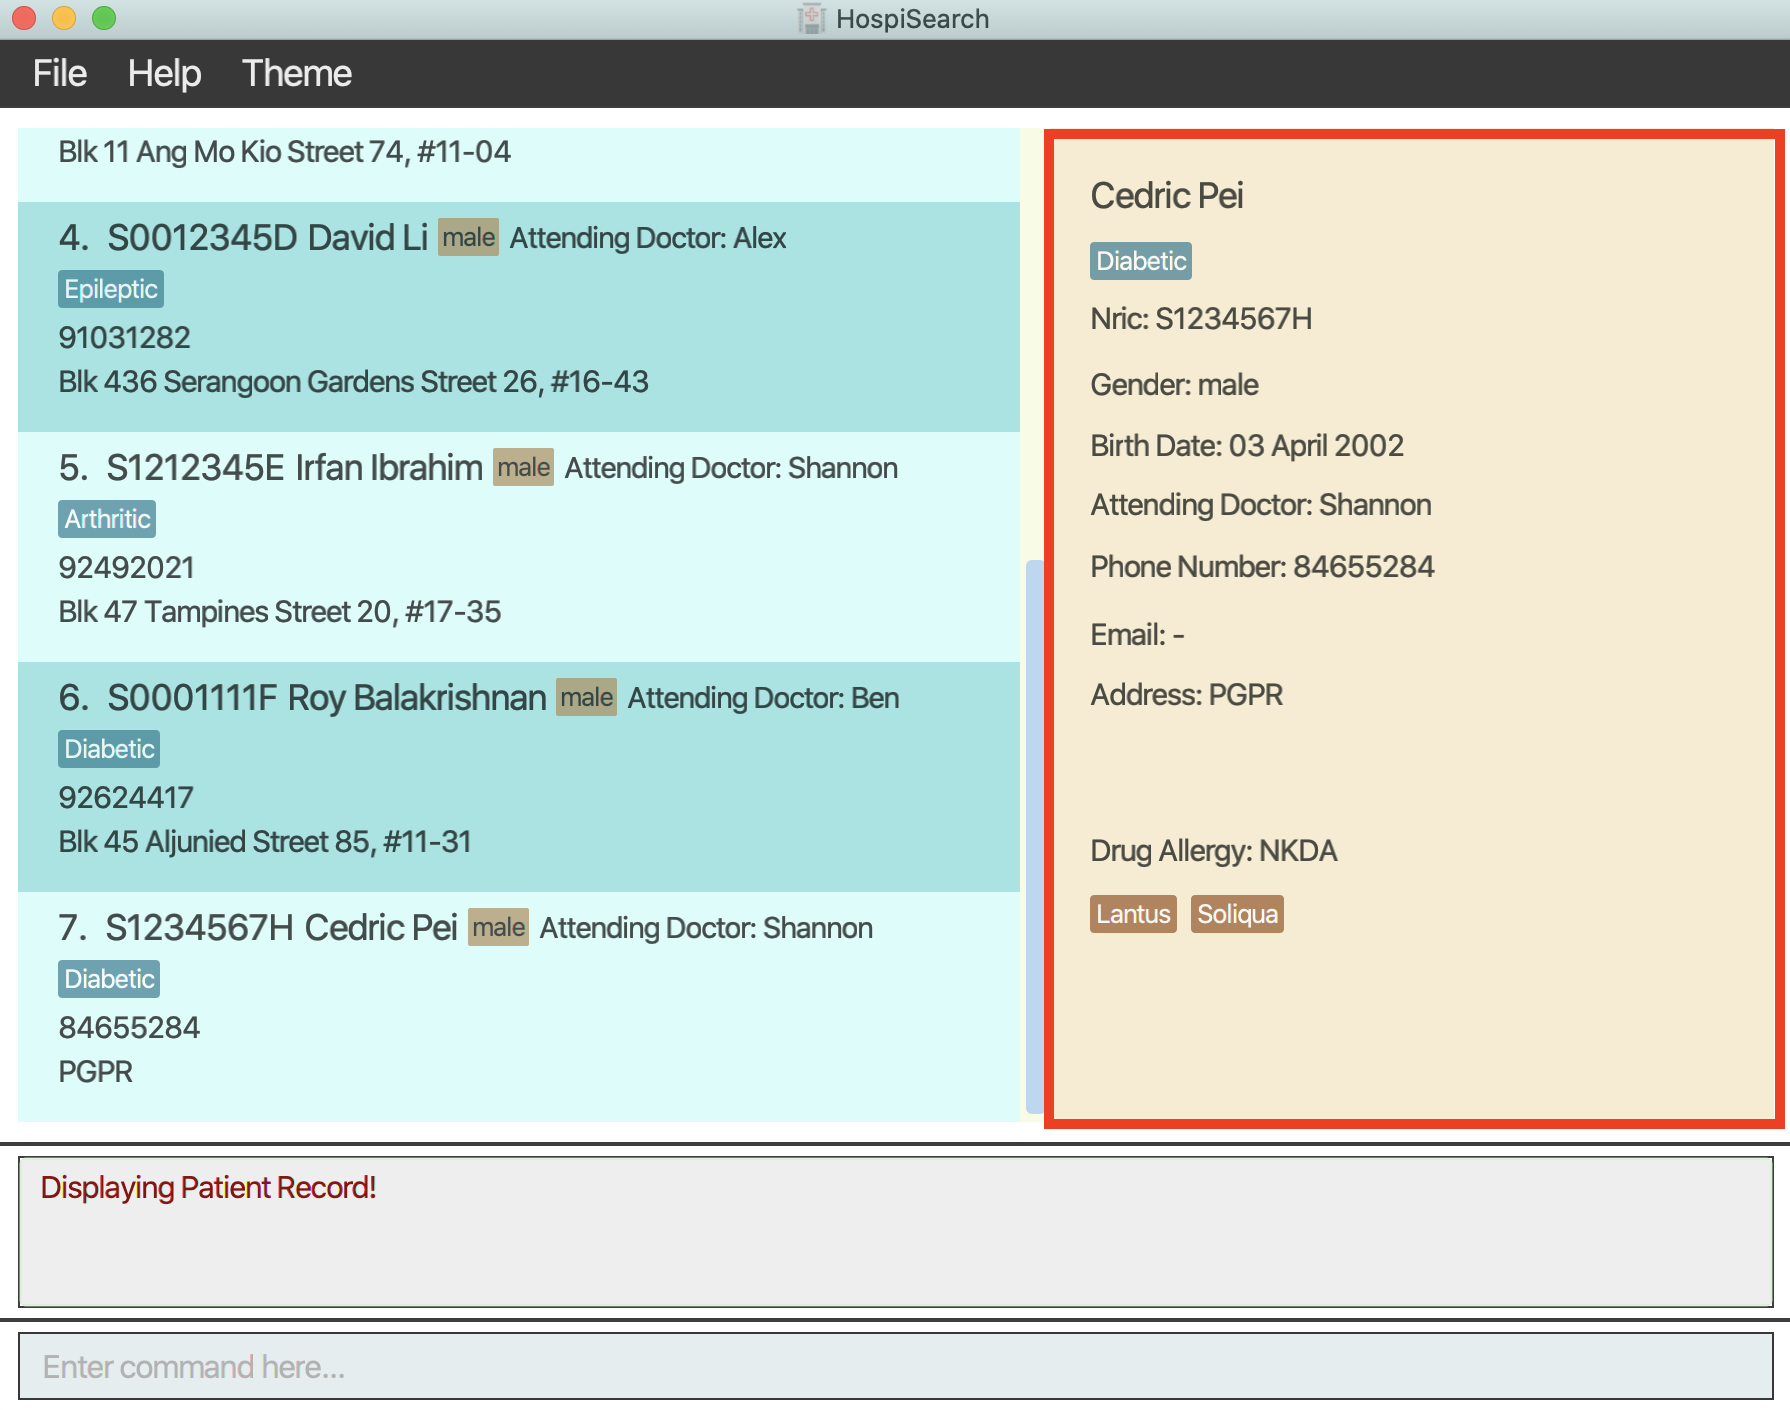
Above is the execution result of the input view i/S1234567H.
💡Tip: Double-clicking on a patient achieves the same result!
Deleting a patient record: delete
Let’s say you have found an unintended duplicate in the patient records. You can delete this erroneous data using the delete command.
Format: delete i/NRIC…
undo command will not undo all deletes made, but only one at a time.
Examples:
-
delete i/S1234567Adeletes the patient with NRIC S1234567A from patient records system.
Filtering patients by attribute: find
Let’s say you want to filter for specific patients quickly during a busy shift. You can use the find command to search for patients
based on their name, age, medical condition, or any other relevant criteria.
Command Prefixes that can be searched:
- name(
n/) - nric(
i/) - tag(
t/) - doctor(
ad/) - medicine(
m/)
Format: find (n/NAME | i/NRIC | t/TAG | ad/DOCTOR | m/MEDICINE ) [MORE_KEYWORDS]
find searches by complete strings and not substrings. The search will only be carried out for
one given attribute.
Examples (The following results are based of the sample data provided):
-
find n/johnreturnsJohn LimandJohn Doewho both contain the nameJohnin their names. -
find n/yu bernicereturnsBernice Yuas the order of keywords does not matter -
find i/S0078957GreturnsAlice Tanwho has an NRIC ofS0078957G. -
find t/Diabetic Osteoporoticreturns all persons with the tagDiabeticorOsteoporoticor both. -
find ad/Shannonreturns all persons with attending doctorShannon.
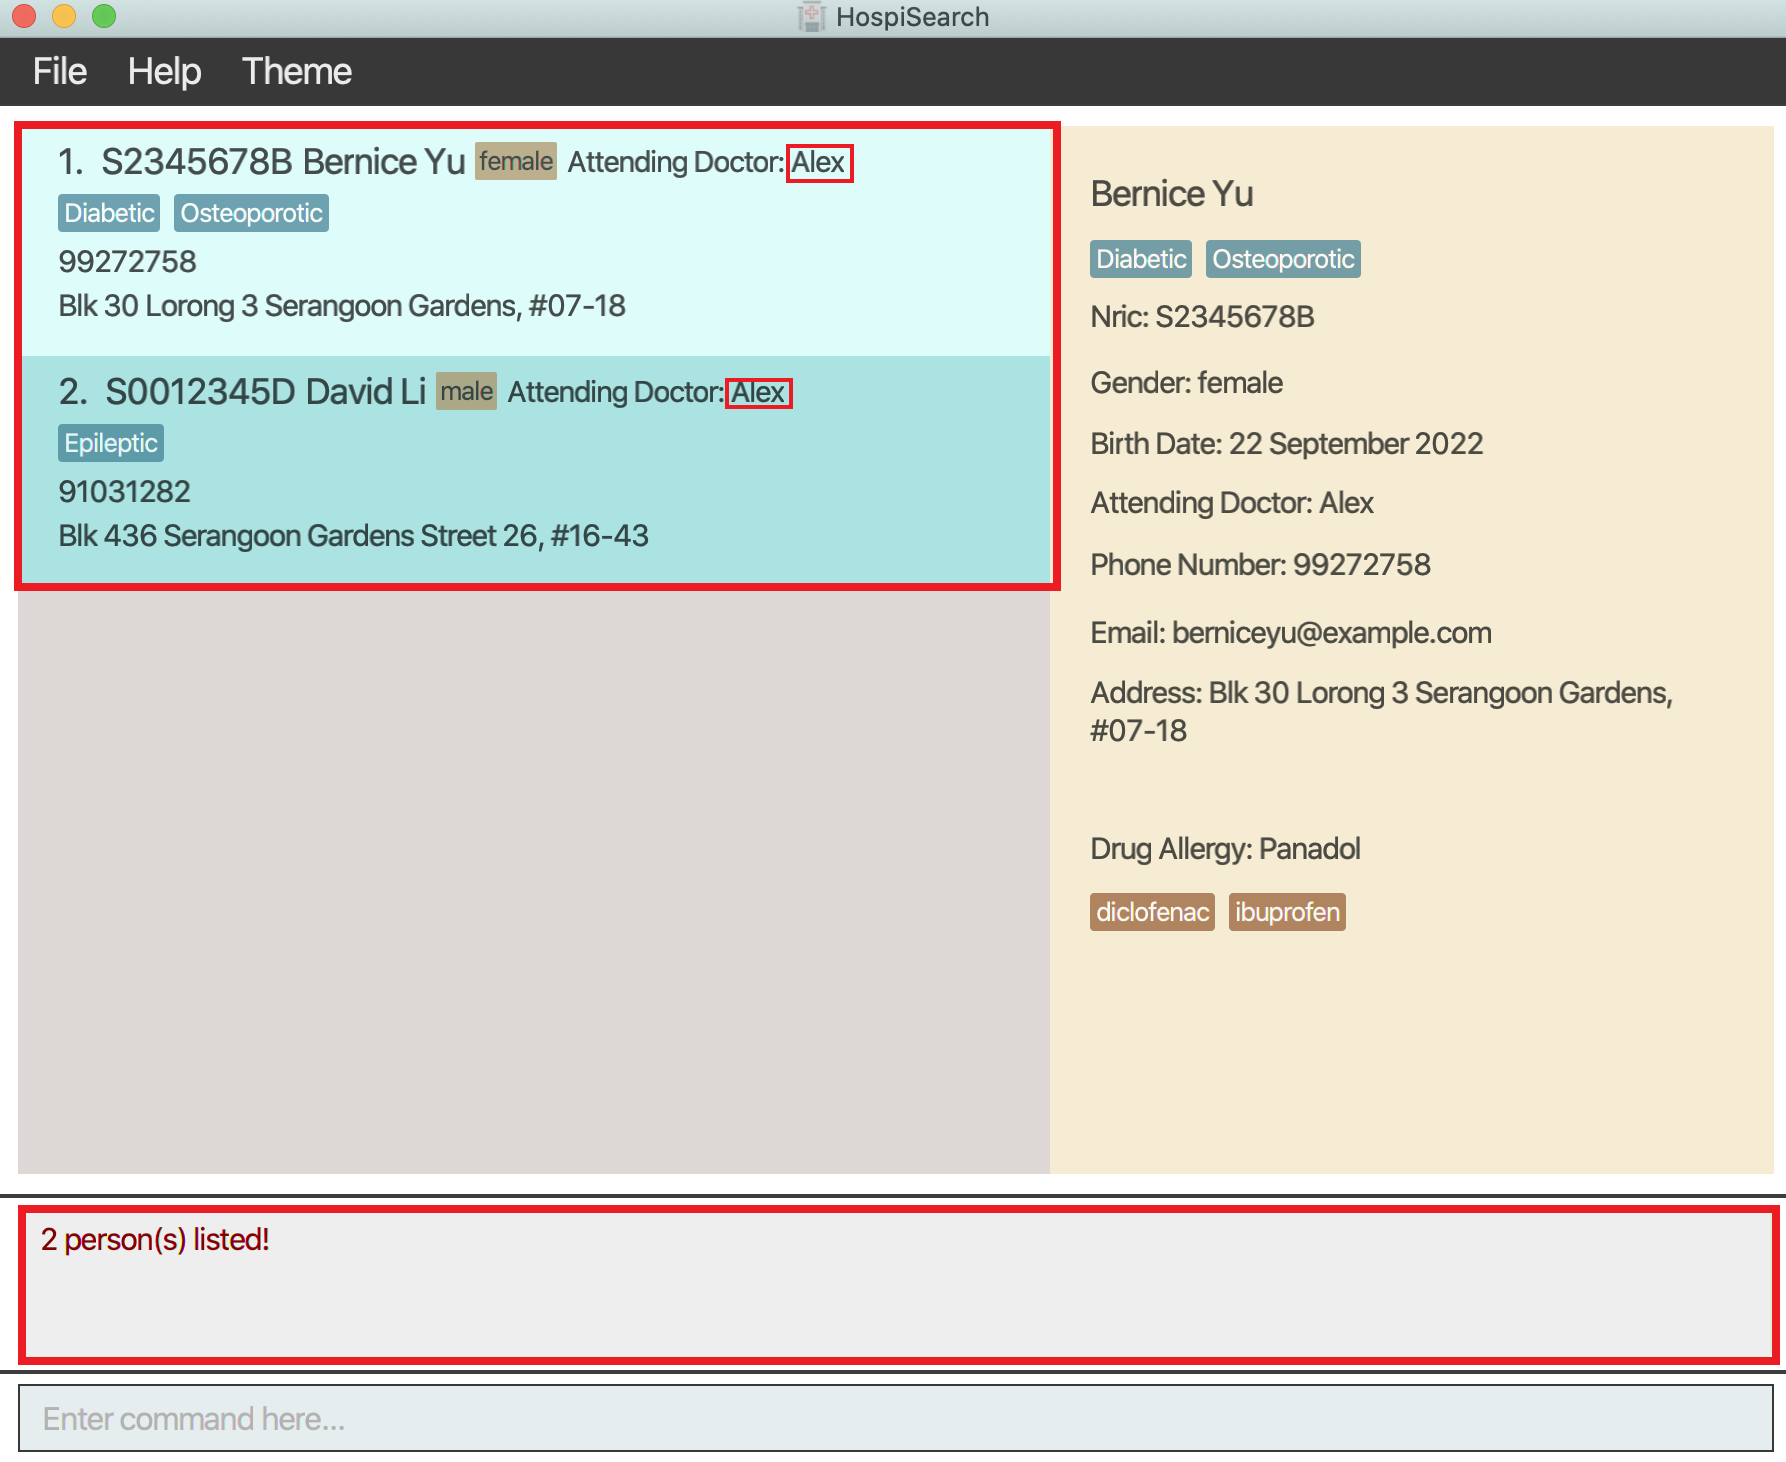
Above is the execution result of the input find ad/Alex.
Listing all patients: list
You can use this feature to get a list of all patients in the records.
Format: list
💡Tip:
After filtering for specific patients, you can view all patients by using the list command.
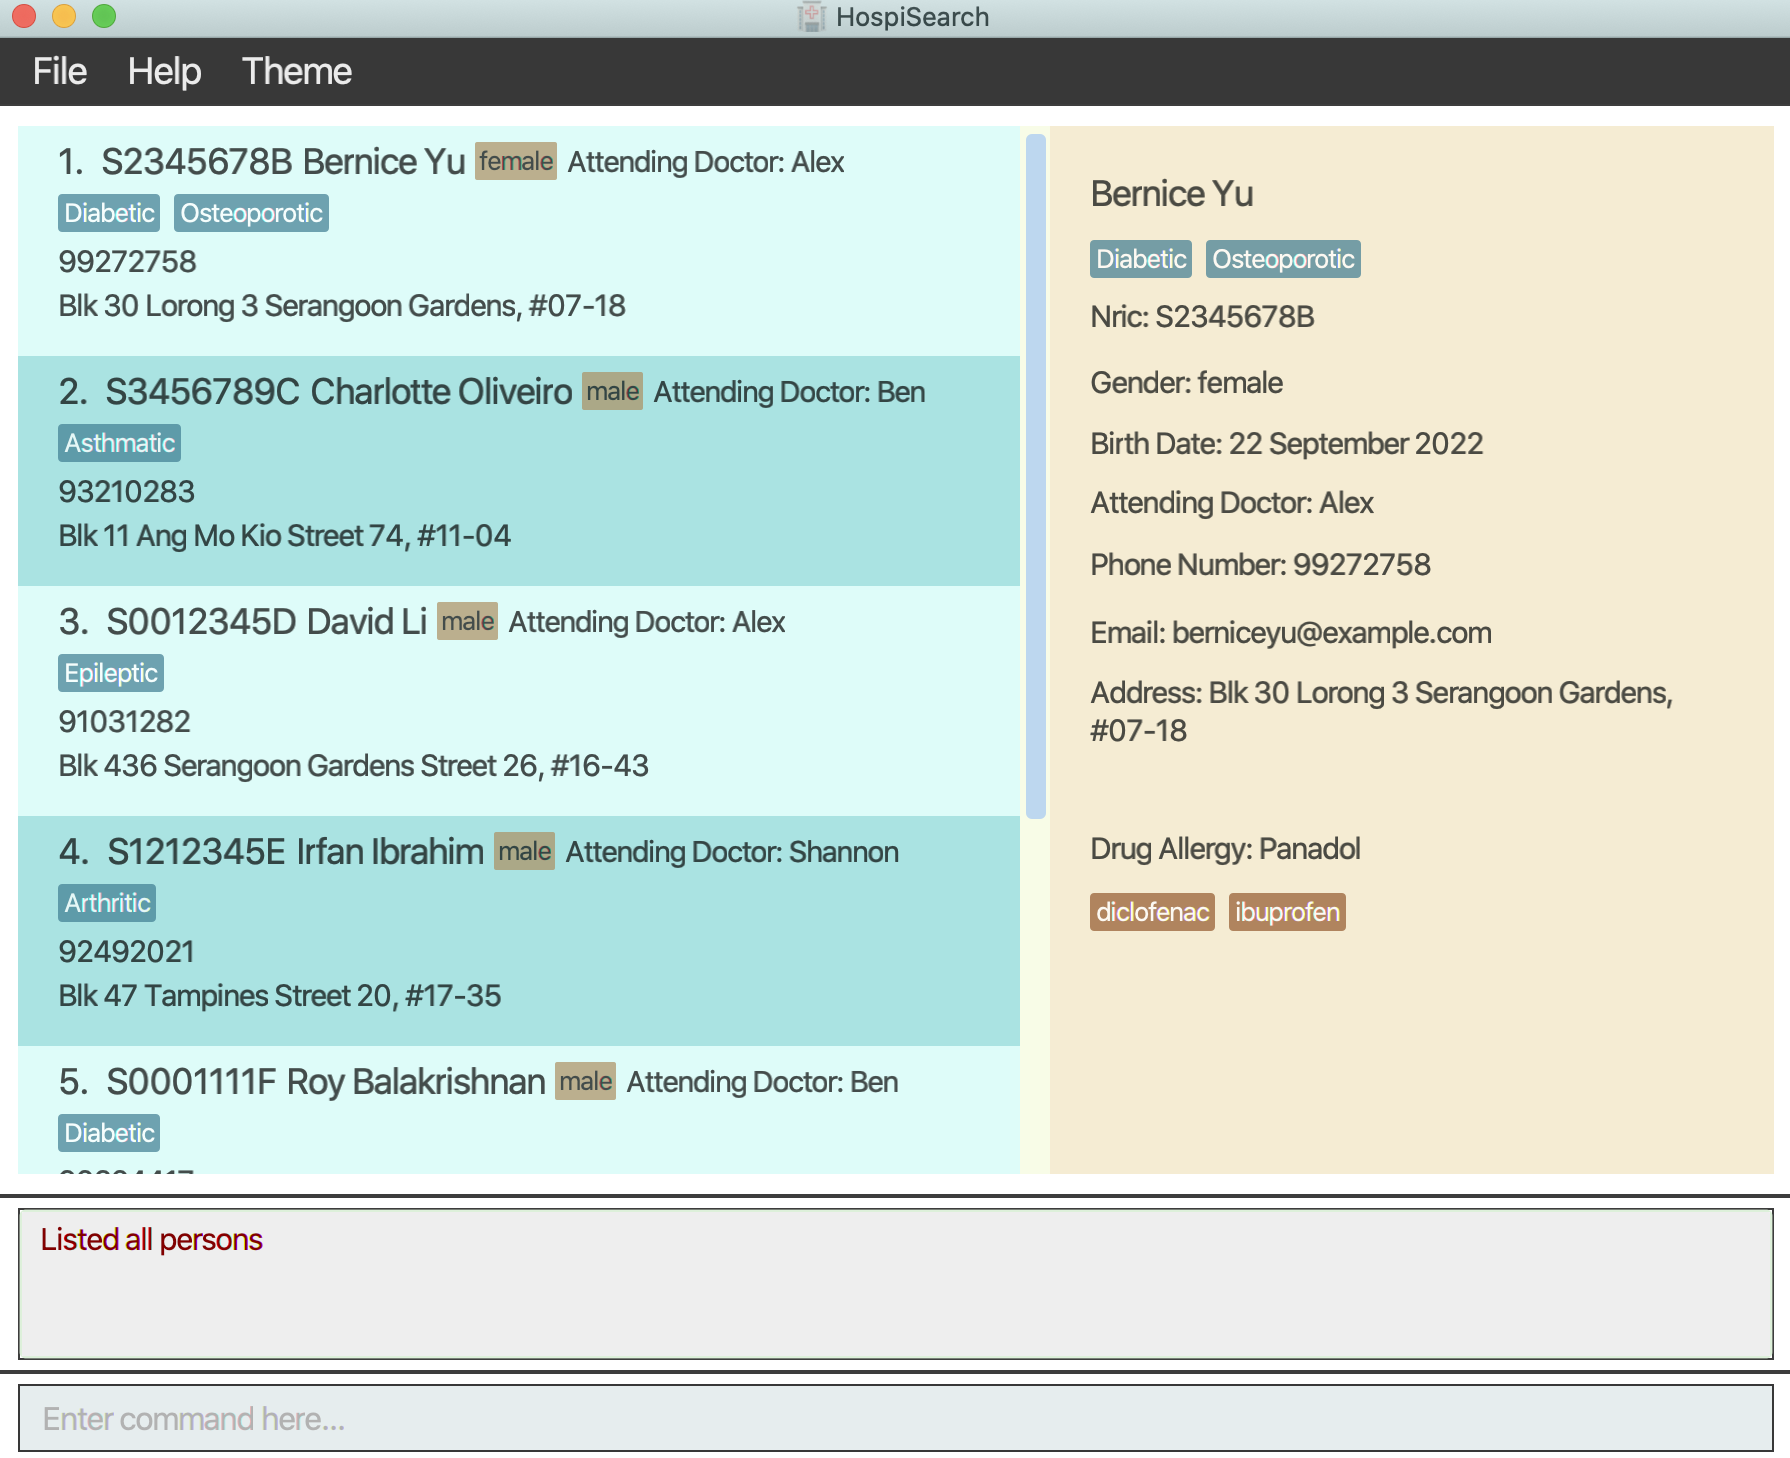
Above is the execution result of the input list.
Backing up patient records: backup
Let’s say you want to safekeep your current data for future reference. You can use the backup command to save the patient records to a specified slot represented by an index and add a description for the backup.
Format: backup INDEX_NO [b/DESCRIPTION]
💡Tip:
Backing up without a description will leave the description field empty.
Format: backup INDEX_NO [b/DESCRIPTION]
Examples:
-
backup 3 b/Testbackups the data to the 3rd slot with description ‘Test’.
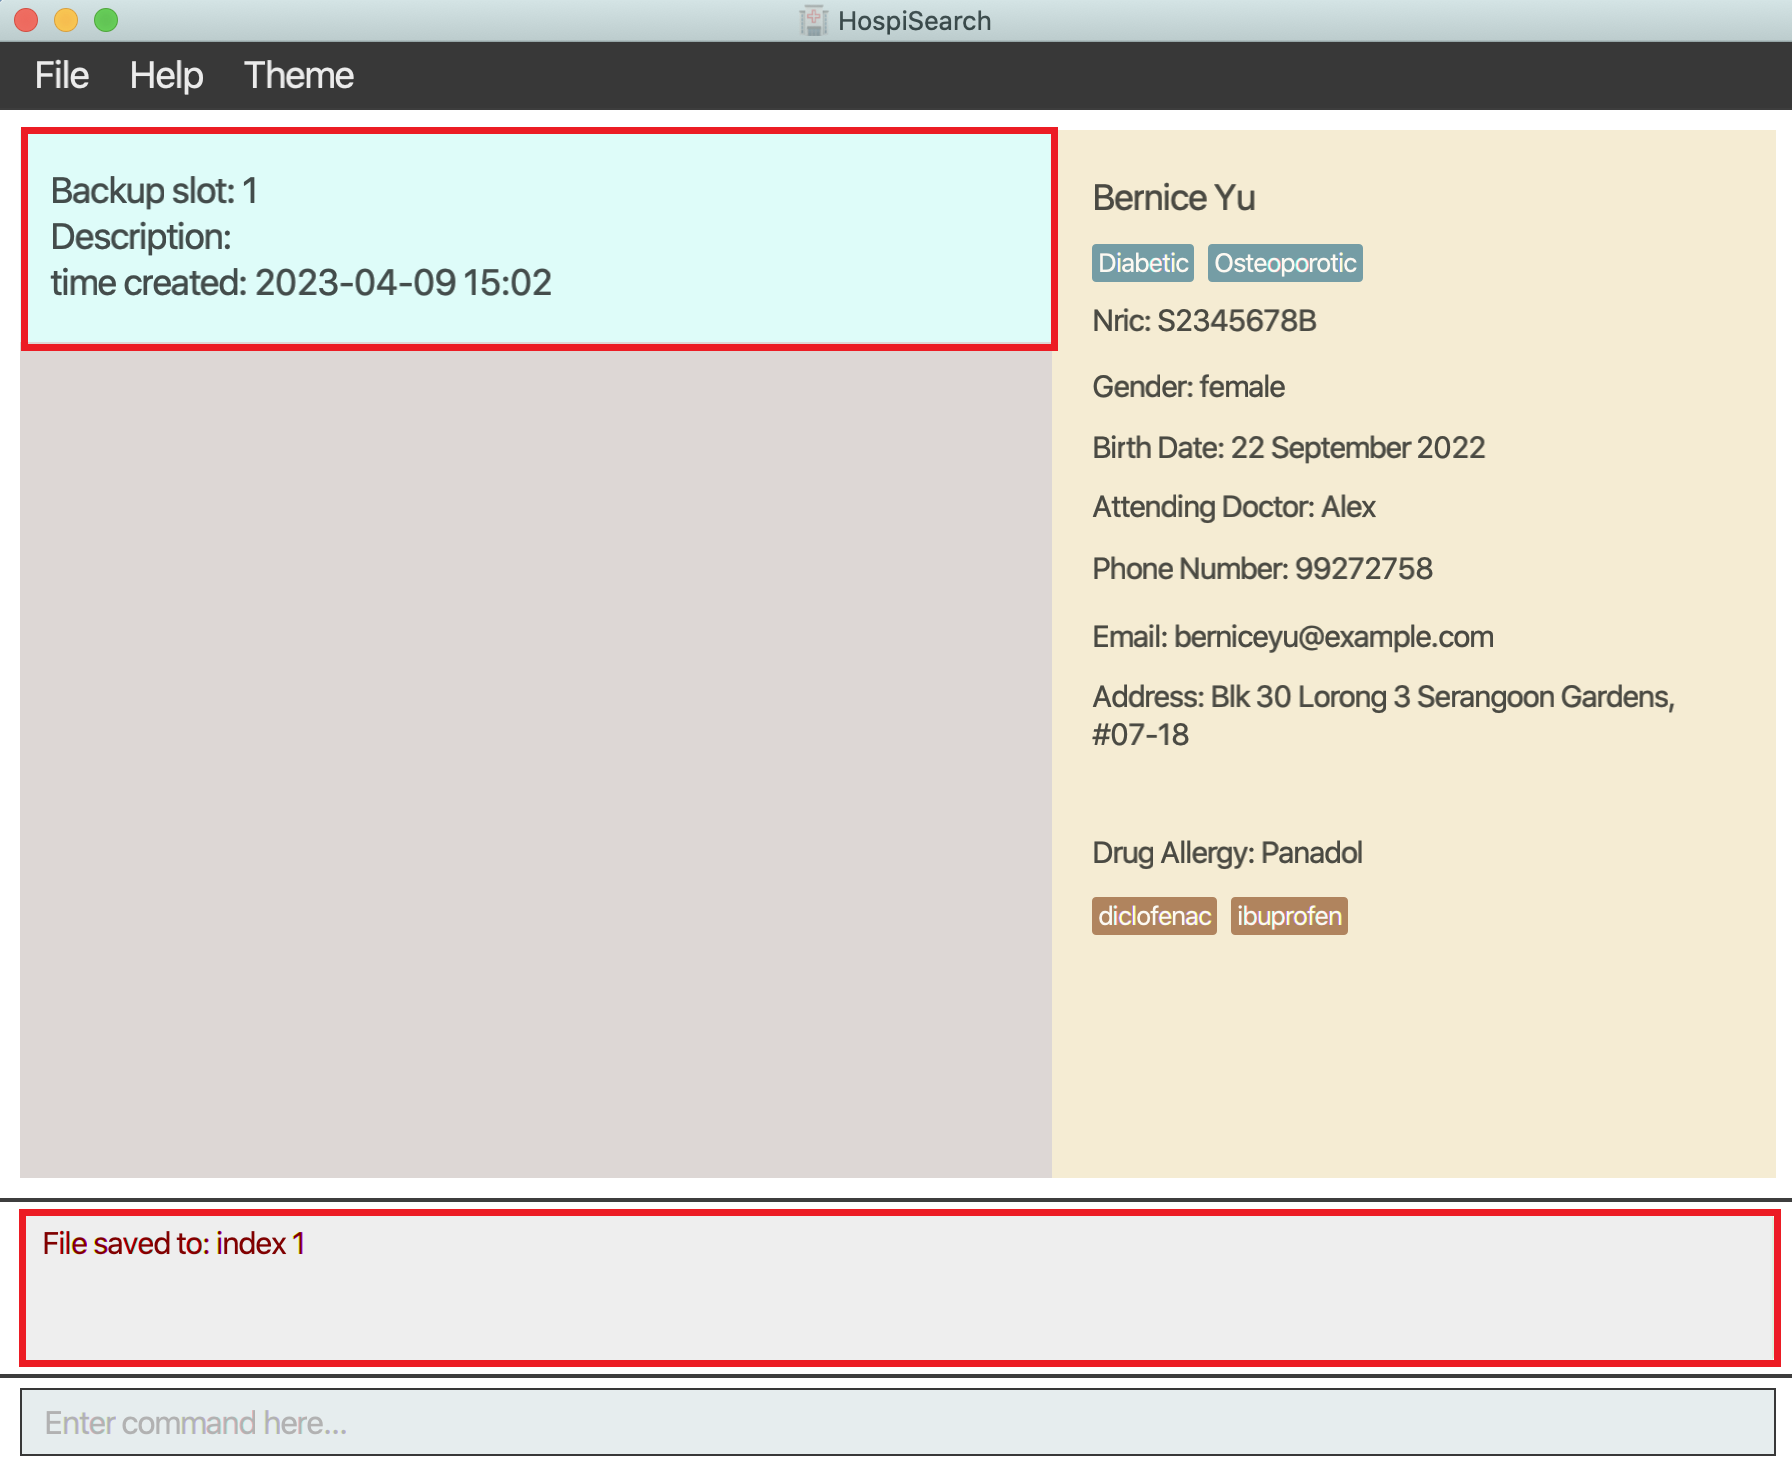
Above is the execution result of the input backup 1.
Loading data: load
In the event of a data loss, you can load the backup data from a specified slot represented by an index.
Format: load INDEX_NO
Example:
-
load 3loads the data from the 3rd slot.
Viewing backup data: viewbackups
You can use this feature to shows all the data you have backed up.
Format: viewbackups
💡Tip:
You can exit the backups page by typing the command list.
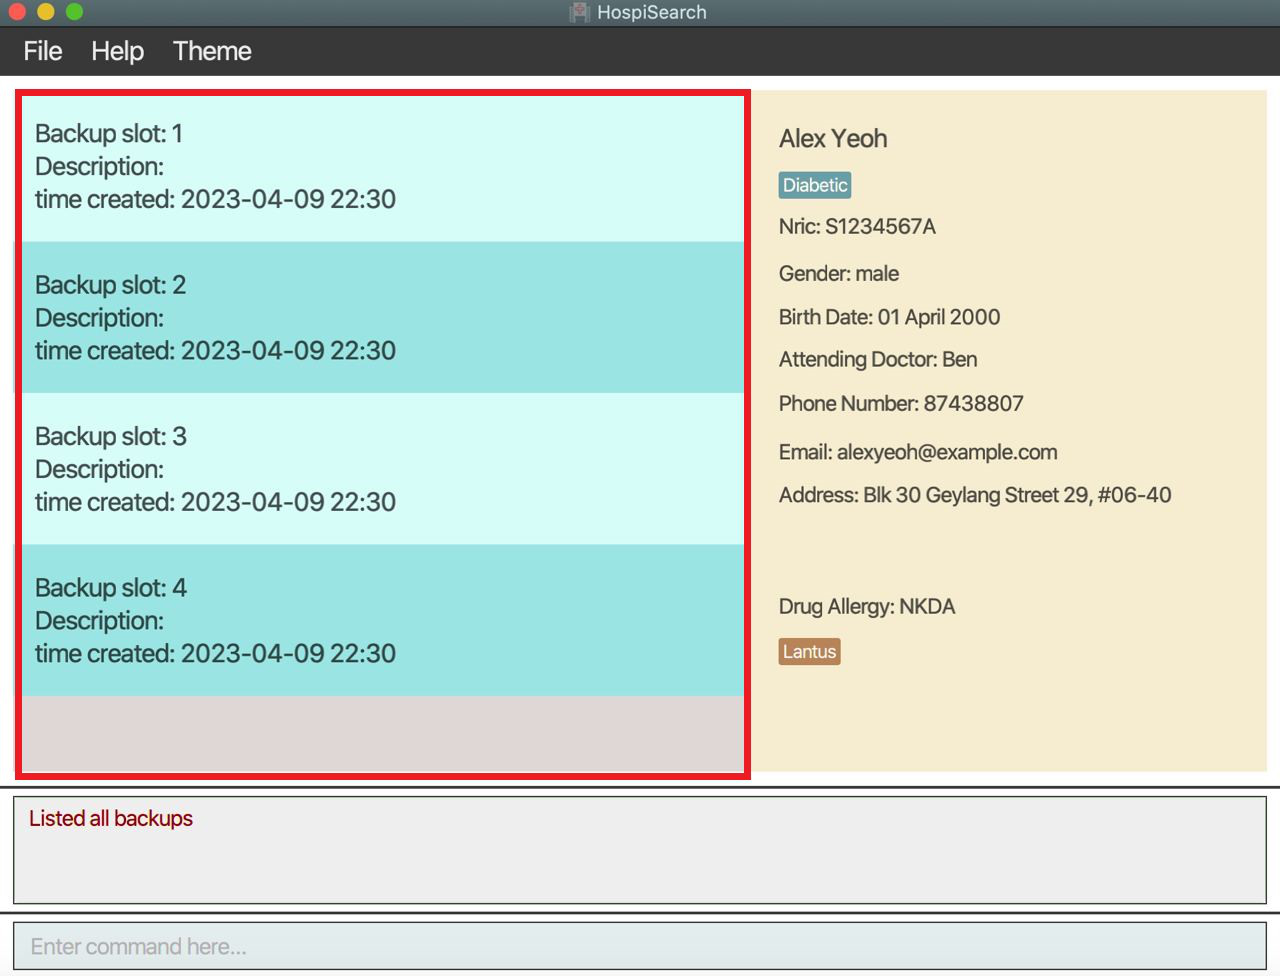
Above is the execution result of the input viewbackups.
Deleting backup data: deletebackup
You can use this feature to delete the backup data from a specified slot represented by an index.
Format: deletebackup INDEX_NO
Example:
-
deletebackup 3deletes the data from the 3rd slot.
Clearing all data: clear
Purges all data from the database.
Format: clear
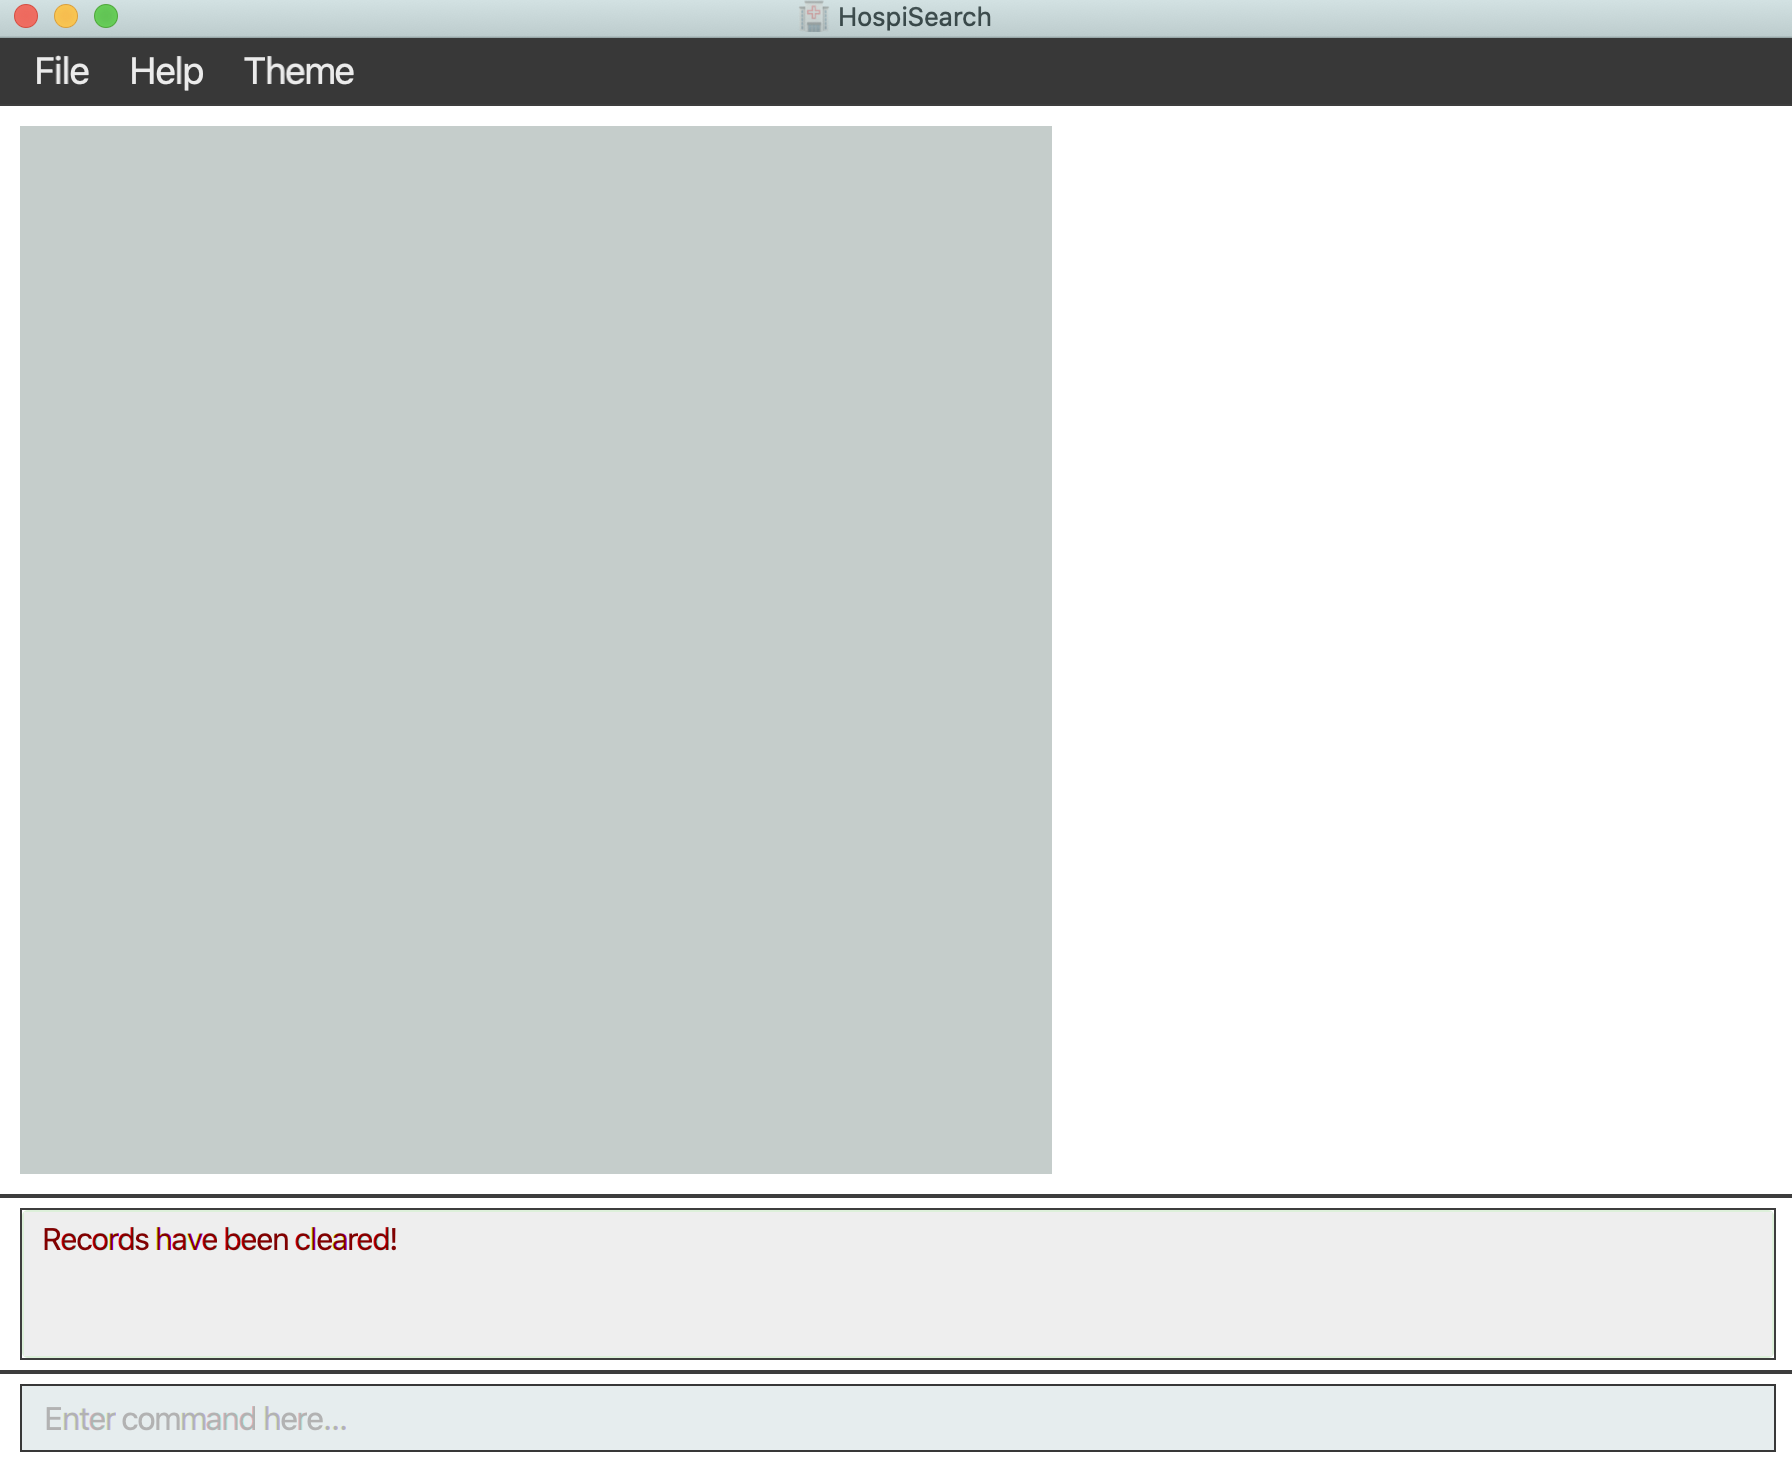
Above is the execution result of the input clear.
Undoing previous command: undo
Let’s say you have made an error when editing or deleting patient records. You can use this command to revert the patient records to the state before the previous command was executed.
Format: undo
Changing the name of a patient above edit 6 n/John Balakrishnan (Previously Roy Balakrishnan)
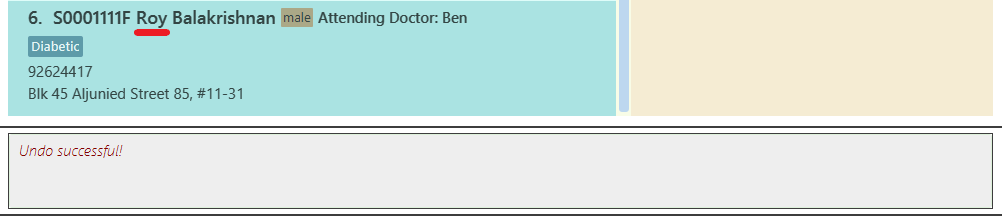
And above is the execution of undo
Redoing previous undo: redo
Let’s say you have accidentally removed the changes you made. You can use this command to revert the patient records to the state before the previous undo was executed.
Format: redo
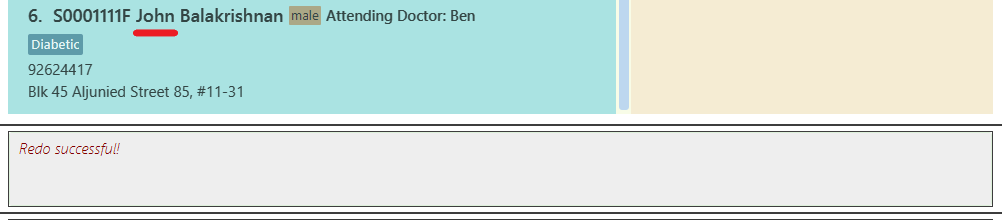
Following the above example for undo, redo would subsequently change the name of the patient again.
Switching to light mode: light
Switches the GUI to light mode. This mode is preferred during daytime as it allows for better visibaility.
Format: light
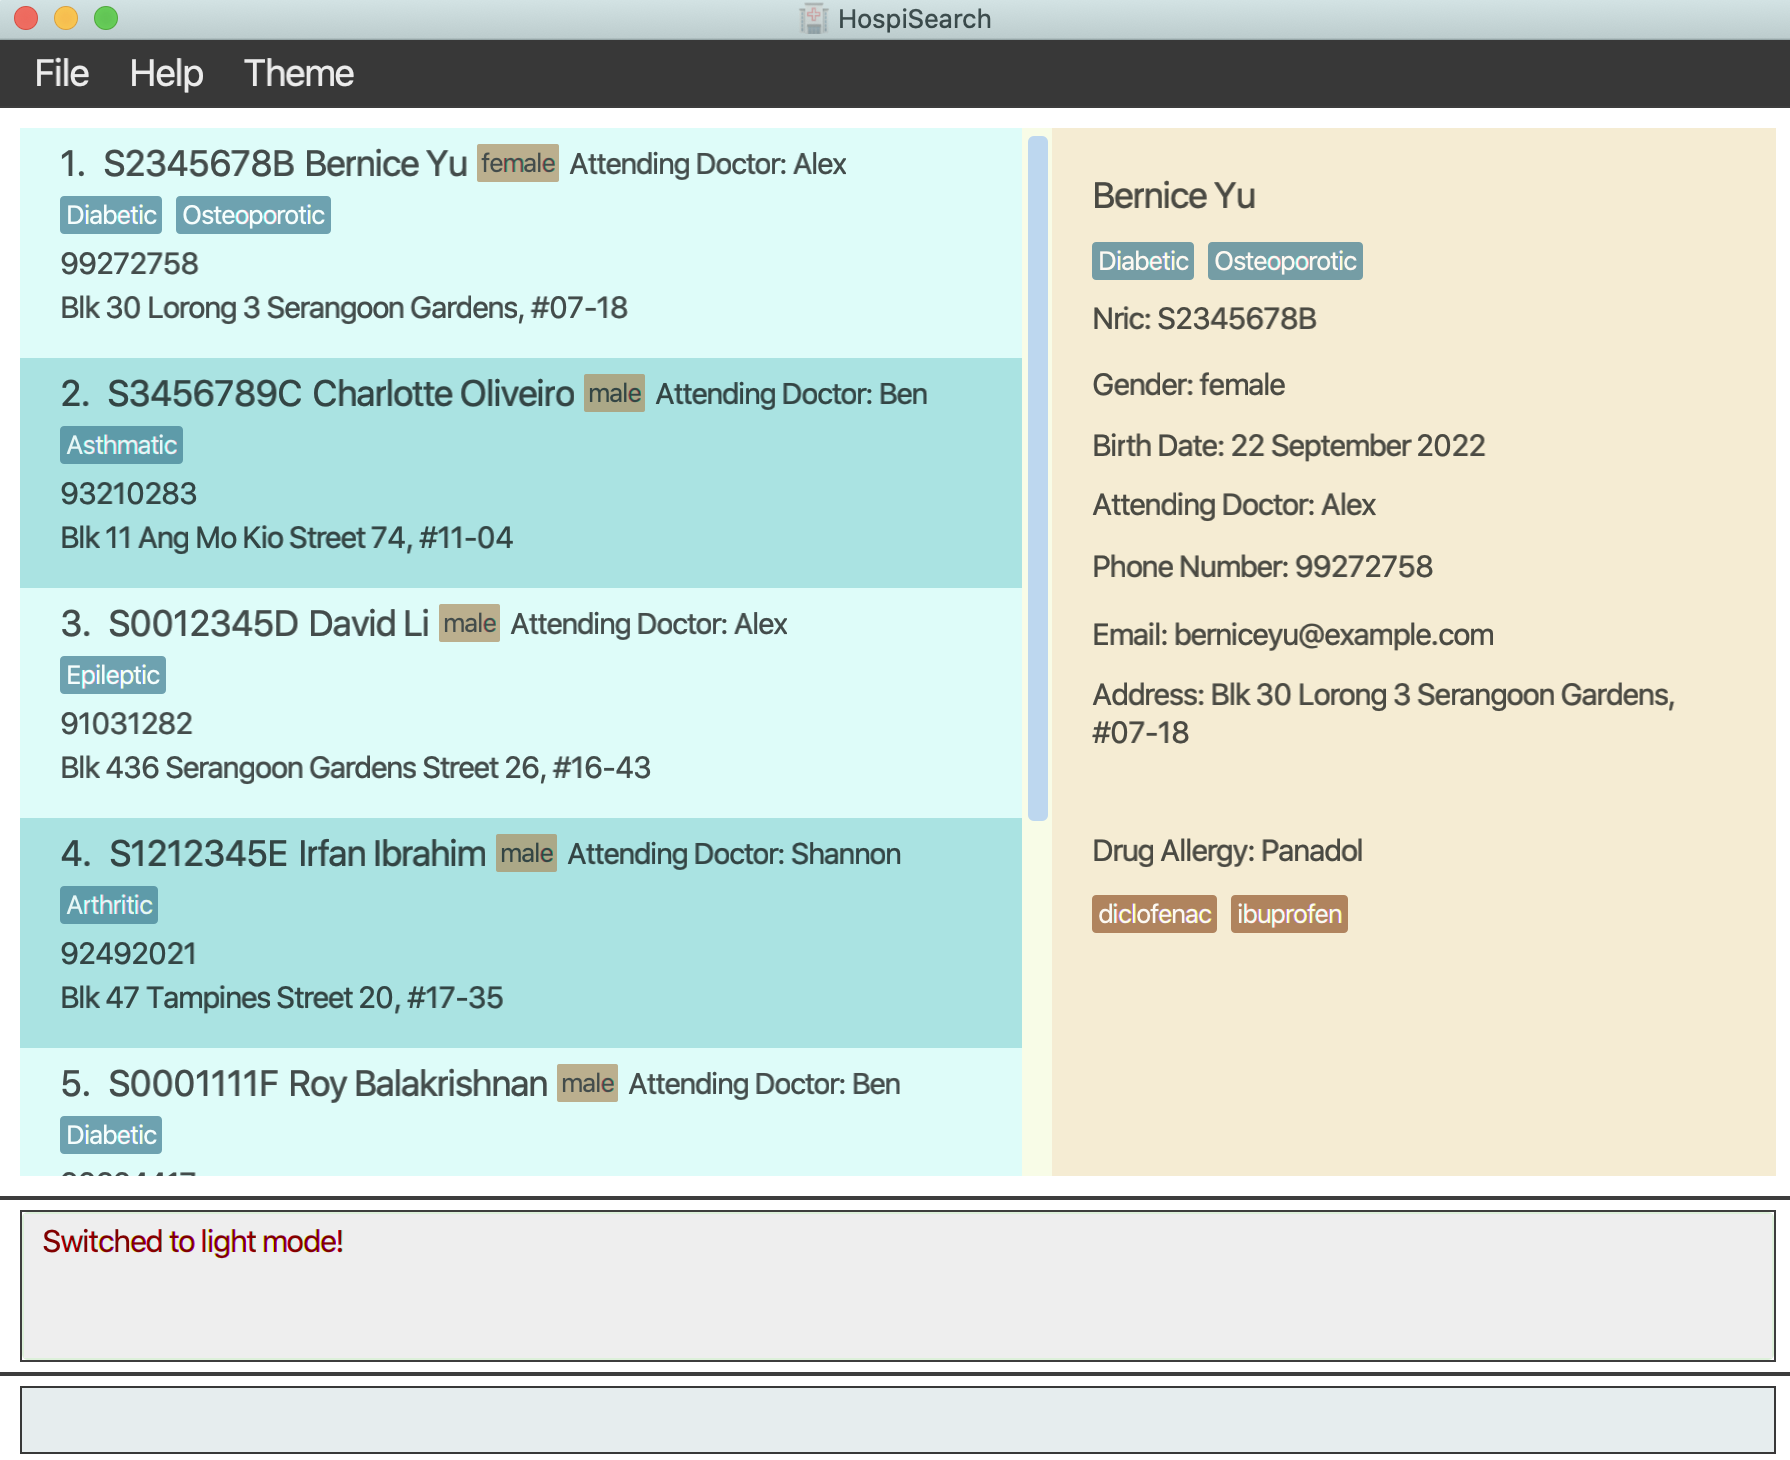
Above is the execution result of the input light.
Switching to dark mode: dark
Switches the GUI to dark mode. This mode is preferred at night as it reduces strain to the eyes.
Format: dark
💡Tip:
The default GUI is light mode. Use these commands and see which is your preferred GUI!
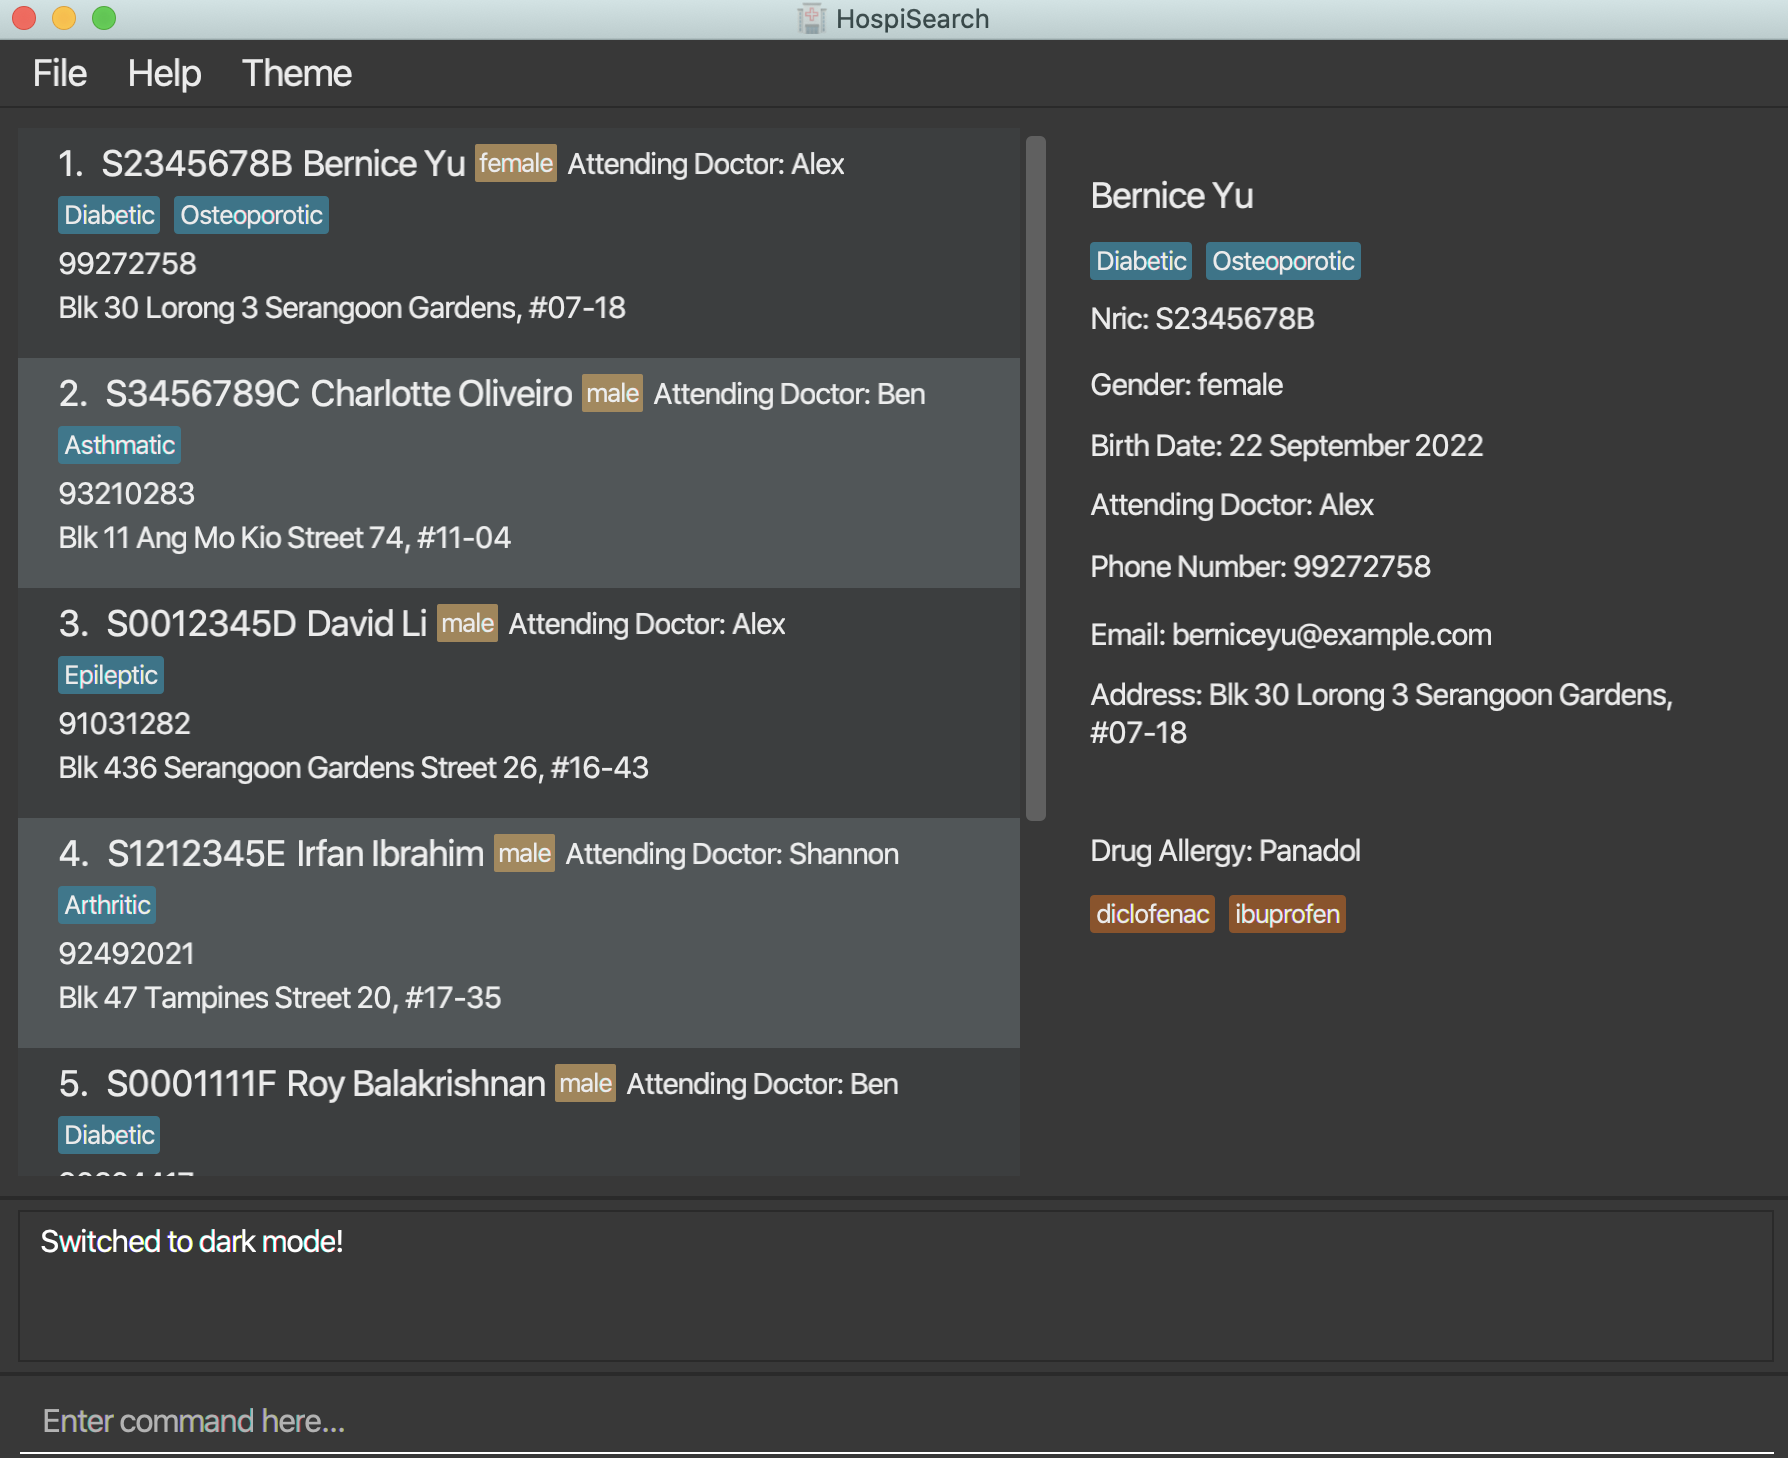
Above is the execution result of the input dark.
Viewing help : help
In case you need help navigating HospiSearch, you can use this feature which lists out all the commands available, along with a brief description.
Format: help
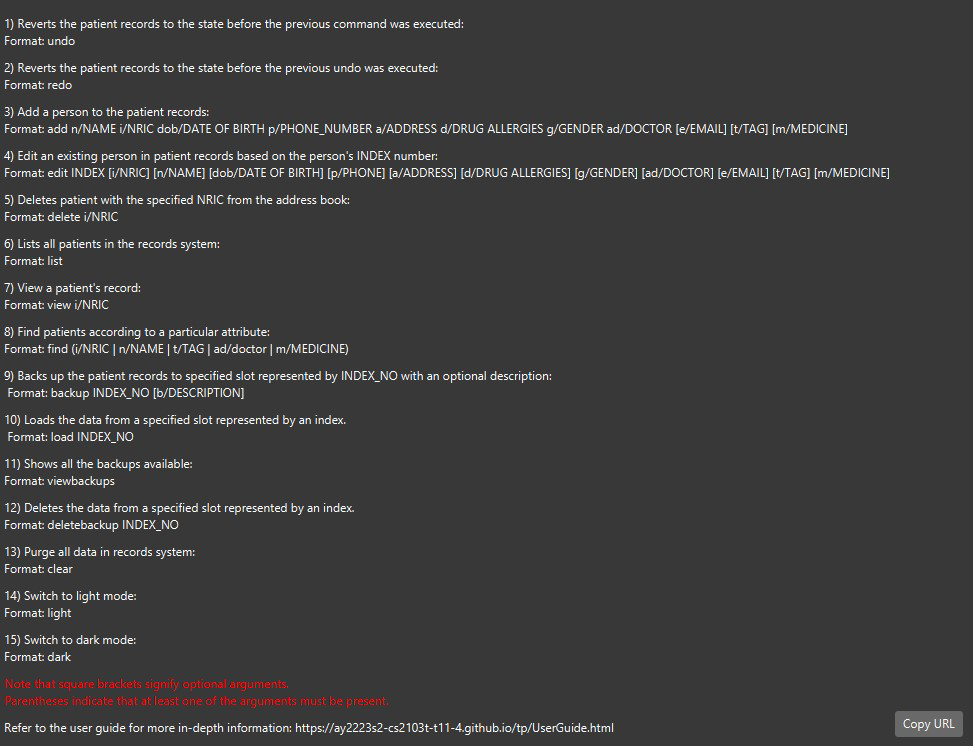
Above is the view of help window after the input help.
FAQ
Q: How do I transfer my data to another Computer?
A: Install the app on the other computer and overwrite all files in the data directory it creates with the files from your previous HospiSearch data directory.
Q: Where is my HospiSearch data directory?
A: The data directory is created in the same folder your HospiSearch Jar file is opened in.
Command summary
| Action | Format, Examples |
|---|---|
| Add |
add i/NRIC n/NAME dob/DATE OF BIRTH p/PHONE a/ADDRESS d/DRUGALLERGIES g/GENDER ad/DOCTOR [e/EMAIL] [t/TAG]… [m/MEDICINE]… e.g. add i/T0012345A n/John Doe dob/20/12/2000 p/98765432 a/John street, block 123, #01-01 d/NKDA g/male ad/Alex t/Diabetic m/Lantus |
| Edit |
edit INDEX [i/NRIC] [n/NAME] [dob/DATE OF BIRTH] [p/PHONE] [e/EMAIL] [a/ADDRESS] [d/DRUGALLERGIES] [g/GENDER] [ad/DOCTOR] [t/TAG]… [m/MEDICINE]… e.g. edit 1 p/91234567 e/johndoe@example.com |
| View |
view i/NRIC e.g. find i/S1234567H |
| Delete |
delete i/NRIC… e.g. delete i/T0012345A |
| Find |
find attribute/KEYWORD [MORE_KEYWORDS] e.g. find a/Alex e.g. find t/diabetic |
| List | list |
| Backup |
backup INDEX_NO [b/Description] e.g. backup 3 b/Day shift |
| Load |
load INDEX_NO e.g. load 3 |
| View backups | viewbackups |
| Delete backups |
deletebackup INDEX_NO e.g. deletebackup 3 |
| Clear all | clear |
| Undo | undo |
| Redo | redo |
| Light | light |
| Dark | dark |
| Help | help |
Glossary
Below is a glossary table for all the technical terms defined in this user guide.
| Term | Definition |
|---|---|
| Command | An instruction for HospiSearch to perform (See Command Summary) |
| Command Line Interface (CLI) | A type of user interface that allows users to interact with a computer system by entering text-based commands. |
| Graphical User Interface (GUI) | A type of user interface that uses graphics and visual indicators such as icons, buttons, and menus to enable users to interact with a computer system. |
| Field | Details that are attributed to each patient. For example, Name, NRIC, and Date of Birth are all patient fields. |
| Prefix | A short form that is attributed to each field when inputing patient data. For example, the field ‘Name’ has the prefix \n. |